Featured Post

Rain Puddles Design Privacy Policy (Click for entire post)

I'm working on a new privacy policy for my followers, but for now, you should know that if you comment on my site, my site collects da...

Showing posts with label Splitcoaststampers. Show all posts

Friday, April 25, 2025

Art Alternative to Screen Swiping


I went on a little adventure for a few weeks and looked through websites and printables on how to make paint dots swiped on paper turn into a birthday cake with candles, and houses, ghosts or cats. I did so many swipes on my phone trying to find something that would work for the classroom I am an assistant in for free art. I decided I was done swiping on my phone and needed to just start swiping paint on paper!

Some of my first tries were fun and quickly got muddy because I kept trying to fill all the holes. In the end I stayed with primary colors so that wouldn't happen. It ended up looking like a glorious sky, so I went with a silhouette card.

This was definitely worth sharing in a challenge, so I made one! Come and play along, add it to your member gallery with the keywork in the challenge and we'll be able to see it in our challenge gallery.


Supplies
: I provide some product links that are through my Amazon Affiliate, and that means when clicked and purchased in the same session a few pennies are sent my way at no cost to you.

Featured Product(s):
  • Handy Art Tempera Paint (AZ)
  • Squeegee/Texture Tools (AZ)
  • White Cardstock (AZ)
  • Black Cardstock (AZ)
Plus:
  • I Love You S'more Stamp Set (AZ)
  • Nocturne Claire Ink Pad (AZ)
  • Pink VersaColor Ink Pad (AZ)
  • Clear Embossing Powder (AZ)
  • Sentiment stamps (mine is retired)
Instructions:
  1. Play with dots of tempera paint and a scraping tool, like a squeegee, either using up the paint on the squeegee or new dots of paint. Use lines of paint, just have fun with no method or end in mind. Let dry and then take a look at it to see what it reminds you of then create with it!
  2. I added black cardstock for a horizon and then stamped trees from the S'more stamp set.
  3. Stamp sentiment in Versacolor Pink ink and add embossing powder.
I'm a maker who receives goodies chosen by myself for design team work. To see a list of these companies just scroll to the bottom of my blog under FTC Declaration.

Pin It

Sunday, March 16, 2025

Leprechaun Lure Challenge


I'm dropping a fun challenge on the blog today, because it has been a while since I've been here and I wanted to share a fun mixed media card from the challenge. I hope you are all doing well, and still getting into the crafting space more than I have been.

If you are ready to jump into the challenge, here is the link. MIX633: Leprechaun Lure


I wanted to use the new (to me) Crocheted Mandala embossing folder on my project so I worked around it. Ironically I ended up with only a little strip of it on my card BUT I love the details of the folder.

The rest of the steps are down below in the instructions section. Hope you are inspired to try something like this card or even a technique I used. Have fun! 

About supplies;
Find what you have on hand for these supplies and always look for the best price for your needs, but for convenience to you, I spent the time linking products with my Amazon Affiliate account below. This means when clicked and purchased in the same session, a few pennies are sent my way at no cost to you.

Supply List
: I provide some product links through my Amazon Affiliate.

Featured Product(s):
  • Crocheted Mandala EF (AZ)
  • DecoArt Metallic Lustre Silver (AZ)
  • Gold Metallic Paint (AZ)
  • Paper Towels (thin - AZ, regular - AZ)
Plus:
  • Clair Nocturne Ink Pad (AZ)
  • Abandoned Coral Distress Oxide (AZ)
  • Picked Raspberries Distress Oxide (AZ)
  • Flower stamps (mine is a retired set) (alternate SBC)
  • Gelli Arts Monoprint Plate (AZ, alternate AZ)
  • Acrylic Paint in Viridian, White, Brown and Yellow
  • Rainbow Loom Rubberbands (AZ)
  • Nuvo Crystal Drops (AZ)
  • Watercolor paint (AZ)
Instructions:
  1. I wiped up a previous watercolor mess with commercial paper towel at work, and it looked so pretty I saved it. Mix a bit of red, and orange, and more yellow all over a nonporous surface and then lay the towel down on the wet surface. Dry and keep it handy for a project like this one!
  2. For the challenge it was a bonus to mix your own gold, green gold at that for leprechaun lure. Equal parts were suggested on the internet, of brown and yellow but it took a bit more yellow. I added a smudge of viridian green to give it the green gold.
  3. On a dry watercolor paper towel, make marks with the gold mixed paint. Add whatever else you want like I added white tinted viridian spatters all over and marks with leftover viridian on my palette knife.
  4. Add it to white cardstock card base cut for an A2 envelope, 8-1/2 x 5-1/2 inches folded to 4-1/4 x 5-1/2 inches).
  5. Glue and trim the paper towel to the card base.
  6. Emboss coral cardstock with Crocheted Mandala 3D embossing folder, rub with metallic wax or paint in gold.
  7. Use up the rest of the mixed gold paint on scrap of white cardstock and spatter with white tinted viridian paint.
  8. Monoprint a viridian background paper. Add white and viridian paint to monoplate with roller/brayer. add rubberbands randomly and pull a print on white cardstock, set aside. Add viridian and a few smudges of brown paint to plate and roll it out, laying the first pulled print over the plate and rub around leaving it to soak and dry a bit. Pull when the edge of the plate comes clean of paint.
  9. Start adding torn and cut pieces as desired to the card base. I chose a sentiment from a stamp set that had little flowers that I decided to use. Stamp them in coral and raspberry colors on home kitchen style paper towel ( it soaks in the ink better) and cut out or if you have a matching die that's even better.
  10. Add sentiment and flowers, adding small flowers around the card as needed in coral ink.
  11. Make flower centers with Pale Gold Crystal Drops.

I'm a maker who receives goodies chosen by myself for design team work. To see a list of these companies just scroll to the bottom of my blog under FTC Declaration.

Pin It

Friday, April 1, 2022

Vignette it Your Way


Hi friends! I was so fortunate to drop into my art studio and get some fun sentiment cards done. It just gives me warm fuzzies when I can do that. Today these cards are for the Splitcoaststampers challenge forum, Mix-Ability!

I have three cards to share that came together rather quickly for two reasons. I have a pile of monoprints ready to use and three new die cuts that I was so happy to get at a local, walk-in-the-door craft store! I'm so glad they are still open!


Lawn Fawn has quite a few "Giant" Lawn Cuts that make for a jiffy card session. I have Giant Sending Big Hugs, Giant Thank You, and Giant Happy Birthday.


Each one of my cards attempts to create a vignette. I say attempt because art and mixed media specifically can be jolted into different directions. 

Sending Big Hugs is a monoprint on deli paper inspired by the amazingly talented Birgit Koopsen. I made a vignette or transition by painting whirling lines. I meant to cut the paper along the lines, but when I realized I was gluing my layer on the base I had already cut it into a rectangle. 

Thank you is a transition with simple lines to hide the abrupt edge of the bubble background mat layer. That background is from when I hosted the MIX468 challenge. It isn't noticeable in the photo but I used Spectrum Noir Sparkle Brush Pens so it twinkles it's Thank You.

Happy Birthday is another monoprint that I did for a challenge and loved it but needed to wait for the right card to use it. I believe it's from the MIX460 challenge and just trying to play with brush strokes.

This week it's 


Supplies
: I provide some product links that are through my Amazon Affiliate, and that means when clicked and purchased in the same session a few pennies are sent my way at no cost to you.

Featured Product(s):
  • Giant Sending Big Hugs (AZ, LF)
  • Giant Thank You (AZ, LF)
  • Giant Happy Birthday (AZ, LF)
  • Rose Friend (AZ, STM)
Plus:
  • White Cardstock (AZ, STM)
  • Monoprinting Plate (AZ, GA)
  • Spectrum Noir Sparkle Brush Pens (AZ, SN)
  • Sequins (PPP)

I'm a maker who receives goodies chosen by myself for design team work. To see a list of these companies just scroll to the bottom of my blog under FTC Declaration.

Pin It

Friday, May 8, 2020

Imagine A Mixed-Media Challenge


Happy Friday, everyone! Today I'm popping in to share a project. A colorful and whimsical card for the Splitcoaststampers Mix-Ability challenge this week hosted by little ole me! 

Our challenge is to use a type of fold or window, an opening of sorts, that we haven't tried before. Keeping with the guidelines of mixed-media, this challenge is pretty wide-open to try out! 

The never tried portion of this card today was the interactive shutter inside the card. I'm sure I've made a gate-fold before, but it's still a rare fold for me. Check out the tutorial on Splitcoaststampers.


Bright acrylic paints and whimsical Laurel Burch stamps are the pieces that make my shutter gatefold card sparkle! See the project supplies and instructions below.

One last thing before you scroll down on the 'How To', I'd like to focus on a small business during this time of COVID-19 change. If you decide to purchase the featured products, consider getting them from the Frantic Stamper company. They stock many Stampendous products and so much more!

Supplies: I provide some product links that are through my Amazon Affiliate, and that means when clicked and purchased in the same session, a few pennies are sent my way at no cost to you.

Featured Product(s):
Plus:
Instructions:
  1. Create a monoprint. Per monoprint plate unpacking and use instructions to create a layered monoprint. Start with Olive Green and Gold Yellow paint, brayer, and pull a print. On another sheet of white paper pull second print to use for another project. Without cleaning, add magenta and little amount of white paint and spread with prayer. Lay down the stencil and pull the print on the first one done with green and yellow.
  2. After monoprint is dry stamp Script onto paper with Onyx Black ink.
  3. Use Shutter Gatefold Tutorial.
  4. Stamp the sentiment from Laurel Burch Imagine Butterflies set onto Mixed Media White Paper and cut with a circle die. Use color cardstock and other circle dies for the mat.
  5. Stamp the smallest butterfly from Laurel Burch Imagine Butterflies set onto an unused section of the monoprint and die cut out. Stamp the larger butterfly on color cardstock and die cut out, stamping the antennae and hand trimming. Glue onto the larger butterfly.

I'm a maker who receives goodies chosen by myself for design teamwork. To see a list of these companies, just scroll to the bottom of my blog under FTC Declaration.

Pin It

Wednesday, November 1, 2017

Beautiful Paint Colors for Metal, Wood and More!


Happy November, everyone! I've got a great little card to share about a new-to-me product that is being reviewed by the Mixability Challenge Group and we'd love for you to stop by and check it out!


Head on over to Splitcoaststampers and find out about the latest Product Focus to find out more!

Pin It

Sunday, August 6, 2017

Shine A Little and A Books Cover


Hey, friends, I've got a mixed media project to share today! I've been having a wonderful summer with my family, but I took a break to pop in the studio for the next Mix-Ability challenge.


Lucky for me I am also the host for the challenge this week and it was inspired by the cover of a book I read this summer so we can combine our reading with our crafting! Join us over on the Splitcoaststampers Mix-Ability forum and show off your inspiration from a favorite book!

MIX236: By the Book


The book? The Other Einstein. I loved the colors and the halo effect of the sky.

To make this card more mixed media style I combined stamping, watercolor, pen, and ink, plus a splatter of white paint.

Here's how I made the card.

My supplies:
I use affiliate links when possible and what that means is when you click an AZ link and make a purchase I receive a few pennies at no cost to you.
Instructions:

  1. Tape down watercolor paper onto a flat surface.
  2. Stamp image with black waterproof ink on the center of the paper.
  3. Paint around the image with watercolors. Let dry.
  4. Use a black pen to script out something in the shadows.
  5. Splatter watered down white paint onto paper.
  6. Stamp image again onto watercolor paper, trim out and glue over painted image.
  7. Die cut a word from white paper and adhere onto the image paper with liquid glue.
  8. Adhere onto color cardstock with double-sided tape.


Pin It

Friday, March 24, 2017

On the Road with Stampendous + MISTI Tool Alert


Hey folks, my week just flew by and I wanted to share some really fun cards I made from the Stampendous catalog.

I'm not sure if you know it, but I love trees. Love to draw them, but I love to color them even more so when the January catalog products were released to the design team I kind of had to squeal.


Where I grew up we had a birch tree in our front yard and try as I might I never climbed it, but I do remember getting close to the trunk and inspecting it. The white bark speckled with black rough patches was fascinating! That tree was one of the reasons I love sketching out trees.

Anyway, you can see my colored Birch Forest card (above) as a project page on the Stampendous website with a supply list and instructions, plus links to the Stampendous products I used.

I have a second card today that I made this week because I really wanted to try out stamping a background with my MISTI!!!!! Here's the card that I made.


I used Cling Camping Words Stamp with the MISTI with a tutorial on Splitcoaststampers.

Cling Camping Words Stamp

Here is the Splitcoaststampers forum where I've been stalking and watching all the videos to learn how to get more out of my MISTI. This video by Lydia Fiedler is what helped me create my card for today.


PLUS! The instructions and supply list for this card are on the Stampendous site here. I feel a sorry not adding it all here for you, but it is Friday before spring break for me and I want to squeeze in some more crafting time before my kids are home! (EDT: I've added the supplies and instructions right here for easy access!)


Supplies (Amazon Affiliate Shopping links = AZ, others non-affiliate):

Stampendous:

  • Campground Perfectly Clear Stamp Set (AZ, STM)
  • Camping Words Stamp (AZ, STM)
  • Fitted Frames A Die Set (AZ, STM)
  • Versafine Onyx Black Ink Pad (AZ, STM)
  • Mixed Media White Paper (AZ, STM)
  • Embossing Heat Tool (AZ, STM

Plus:
  • My Colors Cardstock by My Mind's Eye - Herb Garden, Yellow Corn
  • Memento™ Ink Pads by Tsukineko® - Dandelion, Bahama Blue, Toffee Crunch (all affiliate links)
  • Colored Pencils - Yellow, Green (AZ)
  • ZipDry™ Paper Glue by Beacon Adhesives (AZ)
  • 3D Foam Squares by Scrapbook Adhesives by 3L (AZ)
Instructions:
  1. Sponge Dandelion, Bahama Blue and Toffee Crunch inks onto 4 x 5-1/4 inch Mixed Media White Paper. Let dry or set with a heat tool.
  2. Stamp Camping Words with black ink onto sponged paper at an angle. Repeat until the paper is filled. (MISTI tool was used to position evenly each time.)
  3. Adhere to folded 4-1/4 x 5-1/2 inch Herb Garden card base.
  4. Stamp with black ink the phrase, stars, and grass elements from Campground onto white paper.
  5. Color stars and grass with colored pencils. Sponge Bahama Blue around stars.
  6. Die cut with Fitted Frames and a larger Fitted Frame from Yellow Corn cardstock.
  7. Adhere campground stamped images to yellow cardstock frame with foam adhesive.
  8. Sponge a mix of Dandelion and Bahama Blue onto a piece of white paper to make green, then stamp tree with black ink and trim around image with scissors.
  9. Adhere to fitted frame with foam adhesive.

Friday, February 17, 2017

Petals and Shiny Metallic Things


I've pushed the metal to the floor of winter and created a challenge to encourage spring to quicken its pace.

Yep, today is a new Splitcoaststampers Mix-Ability Challenge and I'll be hosting this week with a combination of petals to the metals. Here's my card that I'm sharing and I've actually compiled a list of fun metal tutorials from Splitcoaststampers for some inspiration!


I chose these lovely lilac stamps from Stampendous for my project because it's Lovely Lilac week over on the Stampendous blog. Stop by there to see more pretty flowers and more from my design teamies, Louise Healy and Pam Bray.


Here's the run down on my card today!

Supplies: (Just a heads up that I am linking to my Amazon affiliate account in the supplies list, but never fear you can also find some links to online stores without affiliate links so you have the choice.)

Stampendous:
  • Lilac Cling Stamp Set (AZSTM)
  • Wood Background (AZ, STM)
  • Mixed Media White Paper (AZSTM)
  • Versafine™ Onyx Black Ink by Tsukineko® (AZSTM)
  • Wagner HT 400 Embossing Heat Tool (AZSTM)
  • Creative Palette Rectangles (AZ)

Plus:
  • Kraft Cardstock
  • Xcut A6 Embossing Folder - Moroccan Star Tiles (AZ, JoAnn)
  • Media™ Fluid Acrylics by DecoArt® - Titanium White, Cobalt Turquoise Hue, Yellow Green Light, Dioxazine Purple, Quinacridone Violet, 
  • MISTI Stamping Tool (AZ, SP)
  • 2-inch Foil Tape Roll
  • Jewelry Wire
  • Chipboard or Cereal Box Board
  • Sponge or dauber (AZ - cut into smaller pieces, EH)
  • 3D Foam Adhesives Squares (AZ)

Instructions:

  1. Stamp Wood Background with London Fog onto Mixed Media White Paper.
  2. Randomly sponge Pumice Stone ink in direction of grain. 
  3. Trim three planks from image and glue to card base.
  4. Splatter with watered down Titanium White paint.
  5. Cut 2 x 2-inch square from chipboard or cereal box and add foil tape.
  6. Emboss chipboard through cutting machine using manufacturers instructions.
  7. Paint desired color (white would work well or use the combination in the next step)
  8. Into a palette, mix the following into three separate bowls and then paint onto tile. 2:1 - Cobalt Turquoise Hue and Titanium White. 1:2 drops of Quinacridone Gold with water. 1:2 drops of Carbon Black with water.
  9. Paint each coat and dry in between. Start with turquoise/white paint mix, then a coat of Quinacridone Gold. The last coat is Carbon Black.
  10. Gently rub off raised embossing with a damp cloth or use an emery board to expose metal from the paint.
  11. Glue embossed tile onto card base.
  12. Quickly mix each paint 1:1 with white tinting base onto Creative Palette  - Quinacridone Violet, Cobalt Blue Hue and Doxazine Purple - and paint into ombre layers, wet with a spray of rubbing alcohol if it dries before pulling a monoprint. Let dry and clean monoprinting plate. 
  13. Place monoprint into MISTI with black foam removed. Stamp lilacs with black ink. Repeat until you have a solid image.
  14. Remove and heat set ink then cut out sections of flowers that are different in color or as desired.
  15. Repeat process with Yellow Green Light and Phthalo Green Yellow for leaves, 
  16. Position flower pieces around faux tin tile and then adhere with foam adhesive.
  17. Stamp sentiment on white paper with black ink and trim into pennant, then adhere to card base to appear tucked into flowers.
  18. Use a piece of silver jewelry wire to add looped element to card and tuck behind flowers over tile.  


Pin It

Friday, September 2, 2016

School Ruled My Project Today!


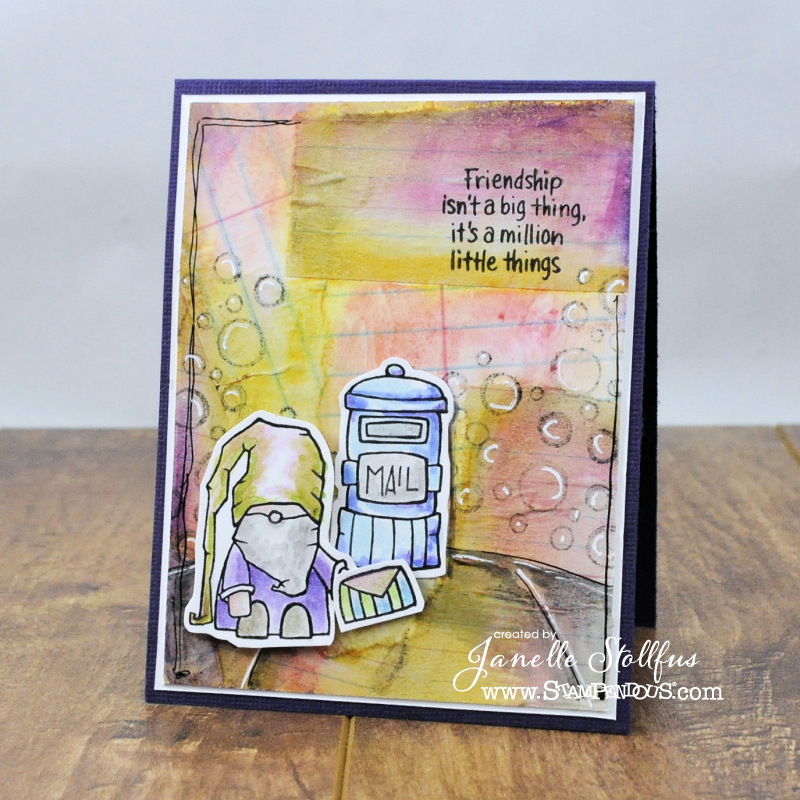
Happy Friday! I'm here today with a mixed media card with a challenge! I'm hosting the Mix-Ability challenge on Splitcoaststampers and I'd love for you to join us! Our challenges are easy and approachable so you won't feel intimidated by mixed media. Browse the forum to find out more about the challenges and then join in on almost 200 challenges anytime!

The challenge is to use school paper (MIX188: School Ruled!)! I made an easy challenge, because if you are a mother of school aged children you are probably just as busy as I am. 


I used wide-ruled and primary paper on the background and had some colorful fun smudging Gelatos with water on my finger, then I sealed it with Matte Medium. I handsketched the sidewalk and stamped the bubbles with 

Disclaimer: I've been watching a ton of videos lately and I'm highly influenced by them when it comes time to create something on my own, so this project is similar in technique to Italian mixed media artist, Nicoletta Zanella. She just happens to be the artist for the stamps I'm using today.


The images are from the Whisper Friends Christmas Stamp Set. Colored with Gelatos and a paintbrush!


The sentiment is from Life Words by Stampendous.

Thank you for stopping by!

Details:
Stamps: Whisper Friends Christmas, Whisper Houses, Life Words (Stampendous)
Paper: Mixed Media White Paper (Stampendous), My Colors Concord Jam (My Mind's Eye), school paper
Ink: Versafine Onyx Black ink, VersaCraft Real Black ink (Tsukineko), Gelatos (Faber-Castell)
Accessories: scissors, Cold Gray and Black PITT Artist Pens (Faber-Castell), Matte Medium (DecoArt)

Pin It

Thursday, May 12, 2016

Hunt for Chalk Paint and the LOVE of Wallpaper challenge!


My sister made me do it. Well, I haven't started it, but soon I'm going to use THE Annie Sloan chalk paint. I received a little goodie box a few weeks ago from my sister with some supplies to encourage me to get the family furniture painted, namely the Gentleman's' wardrobe handed down from my grandma Parthina.

I did a Google search, found a local Stockist and my daughter and I went on a trip to this super small shop that was filled with wallpaper books, wallpaper rolls, wallpaper samples and a honorary chalk painted hutch for THE Annie Sloan line of chalk paints and supplies. Loved learning the steps to get the paint job done and to know that I can go buy more if I run out of my sample pot(s), but I was really intrigued by all the wallpaper designs.

So the mixers on Splitcoaststampers Mix-Ability forum are in for a treat with the new challenge starting this Friday (5/13/2016) because of my little trip to the wallpaper store. We are on an Inspiration Wallpaper hunt with MIX172!

Here are two wallpaper pins that started me down my challenge way.


And here is the card I made.


I used a cut and emboss plate by Cuttlebug in the Anna Griffin line called Bramble Flower. The cuts came from monoprints I had on hand in yellow green, scarlet and rose colors.


Then layers of mediums were added. Watercolor, gold metallic marker, paint markers, white gel pens. The background is Ken Oliver Ultramarine Blue Color Burst, a lot of water and paper towel to texture it. I few squirts of a water bottle was the last texture added.


All was glued together with super tacky i{stick}papers tape (mega roll of tacky red tape) The sentiment is stamped normal papercrafter style black ink on white paper and a snipped end for a pennant look.


Come join us for 

MIX172: Inspiration Wallpaper!

on Splitcoaststampers


Details:
Stamps: Hand Lettered Encouragement (Simon Says Stamps)
Paper: Kraft (Neenah), watercolor 90 lb paper, sulphite white
Ink: Memento™ Tuxedo Black ink (Tsukineko), paint pens (Derwent and Elmers), gold metallic marker (American Crafts), Signo white gel pen (Uni-ball)
Accessories: Creative Palette (Stampendous), Flower Bramble 5"x7" Die By Anna Griffin (Cuttlebug®), seam binding ribbon (Smug Hug), antique cotton thread, i {Stick} papers tape (i {heart} papers etsy store)

Pin It