Featured Post

Rain Puddles Design Privacy Policy (Click for entire post)

I'm working on a new privacy policy for my followers, but for now, you should know that if you comment on my site, my site collects da...

Showing posts with label Layers of Colors. Show all posts

Wednesday, March 14, 2012

God gives all birds their food...


but does not drop it into their nests. Danish Proverbs

At the beginning of the year I purchased some Layers Of Color stamps and stencil and while waiting for a few more to come back in stock I found out that something was a' stirring. A new adventure for the owner/artist, Laura Campbell, was being announced during CHA. She's going to discontinue her e-commerce site and start designing for Spellbinder's and a new line TBA, but also resident artist for a Redmond Wa. company called Imagine Crafts. Sometimes you have to go find those adventures and sometimes... they DO drop into your nest. I'm sure someday we'll get to hear the whole story from Laura.

For me, crafting time has not dropped into my nest so far this week. I had to go grab it last night because I've been catching up on house work and wrapping up some more promotional pieces for the women's conference in April. I hope to be able to get my craft room all cleared out for a craft night I'm hosting in a couple of weeks. It's those crazy fabulous artsy friends of mine that are coming, but my sister from Oregon will be here too! She's definitely got some artsy talent up her sleeve taking a quilt class from a popular designer that happens to be in Boise for the weekend. So, I've got to get more "inspiration" out of the room so we can create more of it! Isn't that how it always goes?

So, instead of clearing and cleaning it ALL up I just cleared a space and time for this card.


 I used a sketch blog I've been stalking from my fellow Diva's Amber and special guest Amy. It's from Jen Shult's Deconstructed Sketch. She always has the best constructed sketches.

Keep in mind...
Verve is having a Spring Sale! 15% off on selected items,

Stampendous continues to celebrate March with a deal for National Craft Month.

Take the links to get inspired and enabled to create! I'll be back closer to the weekend with some challenge cards to share.


Monday, January 30, 2012

Em-spiration and Winners!

This weekend I had the most wonderful time with some friends of mine that have a bazillion ounces of creativity in them. It was a great time of getting to know eachother better and as we exploded out into all sorts of mixed media fun. I'll show you all my ARTjournal page in a minute, but first I want to let you all know about the winners for our Purge Hop!

Kristen from By the Book Paper

Congratulations Kristen!!!!! Please contact me through email with your shipping information!

Each blog winner will be posted at my friends blogs, but I couldn't help to share in who I know won so far. If one of my friends hasn't posted yet, I've put the friend's blog link so you can hop over there and see who one a bit later in the day. Congrats to you all the rest of the lucky winners!


Tosha’s winnerLots of winners at Stamp Talk with Tosh 
Gabriela
Ellena 
Wanda
Naomi 
Barbara A.
Connie Crafter 
Andrea’s winner
Maureen’s winner
Sony’s winner Kelly (irishgalkelly) from Molly and Me
Laurie’s winner … see Laurie’s blog at Just Give Me Stamps
Julee’s winner … see Julee’s blog at Poetic Artistry
Janelle’s winner Kristen from By the Book Paper
Betty’s winner
Toni (Ravengirl) of Sweet Peas Story
Jen’s winner Heather from Wire Wrapture
Teresa’s winner Sherry from Life Is Good

Now here is that ARTjournal page that I mentioned. I watched my friend Em for awhile and how amazingly quick she was at getting her page all covered and designed... then I spent the rest of the afternoon on my ONE page while she completed a few more. LOL She's a rock star!


After everyone packed up and left I sat with my daughter as she made her own ARTjournal page. She had a lot of fun and took off with it before I could get a photo to share, but love the memories we created too. : )

I went back to my page to add in some white highlights and grabbed some new stamps and stencils from Layers of Colors. I dabbed some white acrylic paint onto the Elegant Touch Art Stencil and pressed it down on my page. I left it there and put some brown paint on a paper towel to add contrast around the stencil. Touch of Elegance Art Stamp set by its name is a tell sign that it should be used with the stencil, so I inked some of them up with Onyx Black and randomly spread around. I grabbed a black felt pen and started sketching border lines and defining lines on the page until it looked like I better quit! LOL I wanted to add one more thing though... I stamped the scripture from The Love Chapter Art Stamp set (also from Layers of Colors) a couple of times in Brown Bag ink.

One more thing... Layers of Colors is have a huge discount on all their in stock stamps and stencils. 50% off. It's all in conjunction with a new partnership they are revealing at CHA this weekend!!!! I can't wait to hear what it is all about.


Details:
Stamps: Touch of Elegance Art Stamp Set, The Love Chapter (LOC Art Stamps)
Paper: sketch book, book pages
Ink: gesso, craft paint, Onyx Black (Versafine Tsukineko), Brown Bag (CTMH), Liquid Expresso black pen (Sanford)
Accessories: Touch of Elegance Art Stencil (LOC Art Stamps), brushes, paper towels, friends and a few sweet snacks


Pin It

Saturday, July 2, 2011

Summertime Friends Blog Hop

Hello and happy weekend to all! I’m hopping with a few friends today to celebrate summer and the US holiday, Independence Day. I’m so glad you can join in on the fun and inspiration!

We are starting the hop at Taylor Usry’s blog where all the details about the hop can be found. Even if you see it here in my post, she will be the official list and guidelines keeper.

If you have been hopping from the start, then Mary should have been your last stop before arriving here.

If you feel like a chance at a prize we have just the ticket for you! Go back to the beginning of the blog hop list and comment your way through as your creative mind catalogs all the great projects. You have until Tuesday, July 5th at 6:00 PM EST to comment on as many blogs as you can. Winners will be drawn from random comments on blogs, and announced on Wednesday July 7th (on Taylor's blog.


My project today is inspired from the new mixed media trend and a few outstanding artists like Sherry Cheever who I’ve come across for inspiration in “Chunky Art”. I've made a wooden price tag cut from a 2 x 4 plywood using my miter saw (love it), and some old touch up paint sanded away for the worn look. I combined a couple of flower techniques made from unused coffee filters as the paper. My blossom nestabilities for the shape and some old college watercolors for the color.


It's time to stroll on to Erin's blog for some adorable inspiration!

Master blog list

1. Taylor16. Wendy P
2. Cyndi17. Suzi
3. Lynn18. Kathy
4. Patricia19. Beth
5. Alison20. Wendy J
6. Berenice21. Kerry
7. Erica22. Louise
8. Mary 23. Liz
9. Janelle 24. Laura
10. Erin 25. Lee
11. Maria26. Jennifer I
12. Jennifer D27. Krissy
13. Pam28. Sunghee
14. Angelique
15. Sandie


Winner’s Prize List (13 prizes)
Stampendous
(3 prizes)
1 Cling Jumbo Tulip set
1 Cling
Jumbo Tiger Lily set
1 Cling Jumbo Dogwood set
each set comes with a
Jumbo Perfectly Clear Handle
Chi Chi Memories1 digi stamp of winner’s choice
Pixie Dust Studio
(1 prize)
2 digi stamps of winner’s choice
Dreamweaver's Stencils1 prize pack to winner
Karber Digital Studio 
(1 prize)
2 digi images of winner’s choice
Maria Levine 1 Ippity kit
Skipping Stones Design 1 clear set
Cindy Coutts/Christian Paper Crafts 1 Stampin’ Up Fast and Furious set
Sunghee Chon 1 a muse studio catalog + 1 stamp set of choice (Value equal or less than $12.99) for US residents only
Sunghee Chon / Little Potato House$20 gift certificates to Little Potato House template shop for US or non-US resident.
Karen from Your Next Stamp Ellie Loves the Beach stamp

Have fun and hope you win something from the prize list!

Tag Trio Details:
Stamps: LOC Acanthus Leaves Clear Art Stamps, Verve Feel the Sun
Paper: DCWV Linen Closet, Stampin' Up Chocolate Chip, watercolor paper
Ink: CTMH Colonial White, Stampin' Up Chalks, Brilliance Graphite Black
Accessories: Nylon Cord, coffee filters, corsage pins and beads, pleated white ribbon, Pebeo Chocolate Pearl Dimensional Paint, half pearls and string pearls

Monday, February 14, 2011

Virtual Valentine's Blog Hop - CLOSED


Happy Valentine's Day!


A bunch of friends and designers got together for a Virtual Valentine's Day hop. There are 40+ participants and 19 sponsors giving away a total of 21 prizes. Random commenter's will be drawn from random blogs, so the more love you leave the more chances you have to win.

So I'm in it! Start at Taylor's blog, here, if you just popped in and want a chance at the oodles of prizes that are up for grabs JUST for commenting on the blog list of hoppers (see full list below).

You can comment on all the blogs leisurely up until Thursday at 6 p.m. EST.  The winners will be drawn using Random.org Find out if you are winner on Taylor's blog and she will have a temporary Email Me to get a hold of her for up to one week after the winners are announced.


Here's the prize list to whet your whistle!

Stamp Insanity - with a Digi stamp set of choice for one winner
Meljens designs - 4 digis to one winner
Pixie Dust Studio - 2 digis to one winner
Lizzie Anne Designs - $10 gift certificate (donated by Taylor U)
Christian Paper Crafts - 1 year general membership
Paper Pretties - 3 total winners: 1 person will receive Timeless Love stamp set; 2 people will receive 5 digis of their choice from the store
Karber Digital Images - 2 digis to one winner
Di's Digi Downloads - 5 digi images to one winner
The Scrappychick Boutique - 2 6x6 Cosmo Cricket paper pads to one winner
Stampendous - 4 cling rubber stamps from new release to 1 winner
Pink Cat Studio - 5 digis of winner's choice to one winner
Amber Ink - $10 gift certificate
Simply Betty Stamps - 3 digis of the winner's choice
Mark's Finest Papers - set of their choosing to the winner
Dreamweaver's Stencils - a couple stencils, pearlescent embossing paste and a palette knife
Chi Chi Memories - Meaning of Love Digi Stamp Set to one winner
Little Potato House - $20 gift certificate
Kenny K digis: 4 digis to one winner
Kraftin' Kimmie Stamps: winners choice of 2 images


Here is the full blog hop list if you should get lost along the way. Have fun and be inspired.

Taylor Usry
Libby Hickson
Cindy Coutts
Cyndi Bundy
Amber Hillman
Angelique Nederpel
Tanya Johnson
Suzi McKenzie
Cathy Wallington
Pam Hornschu
Wendy Price
Patricia Hays
Maria Levine
Sandie Dunne
Juanita Gillen
Janelle Stollfus- YOU'RE HERE!
Mary Collins
Berenice Rendon
Cheryl Gorka
Jessica Fitzgerald
Dee Morris
Darsie Bruno
Sandy Allnock
Margie Cortina
Kathy Fronczak
Cat Darling
Joyce Martens (Jolara)
Erin Leveille
Gudrun Loennecken
Mackenzie Bruckler
Melissa (Pink Cat)
Patty Tanuz
Emily Leiphart
Jane Matsumoto
Kimme Leach
Kerry Kung
Heather Lee-Reppen
Rachel Sztonyk
Jennifer Dove
Lysa Q
Erica Johnson-Wanzer
Tina Kiehn
Sugar Whiting
Karin Martin
Sunghee Chon
Tanis Palmer
Lindsey Martin-Penny
Kristi Parker Van Doren
Julie Elak
Alison Heikkila
Audrey E
Laura Drahozal
Louise Healy
Wendy Jordan
Lynell Harlow
Terrece Siddoway
Liz Martin
Kim Reid
Beth Ranney-Thomas

Details:
I used a Tim Holtz Fades Damask embossing folder on the background paper inking up one side of the folder first with Rose Red ink. Then I went back over the embossed paper with a brayer loaded with some more Rose Red AND flattening it down for a stamped layer of the script verse stamp in CTMH Cocoa. I sprayed some watered down Chocolate Chip re-inker on the paper and then some Marshmallow Tattered Angels mist. Distressed that patterned paper and sponged the edges. Straight stitched it to a mat of brown paper with brown button thread.

The cluster is a Labels 1 die on soft suede and edge distressed and sponged. A dusty rose satin ribbon ruched on each end. A love collage stamped in CTMH brown bag ink and misted with re-inker and heat gun dried for spot stains and I left the natural curl from it drying. Edge distressed and sponged and mounted on Glue Arts sponge adhesive. The heart pendant is made from DIY porcelain clay with pink re-inker mixed in and an eye hook into the top. It's threaded through a distressed and wrinkled Martha Stewart silk ribbon and layered underneath another same ribbon tied in a bow. The shabby flower is a DIY leftover from my MOPS group name badge project that I glued onto the ribbon and card with Alene's Quick Dry Tacky Glue. Whew!

Thanks for stopping by my blog today,

janelle
Stamps: Layers of Colors The Love Chapter
Paper: Soft Suede, Cream
Ink: Ugh! A lot... SU Rose Red, Ranger Worn Lipstick, CTMH Cocoa, Chocolate Chip, CTMH Brown Bag, Ranger Walnut Stain Ink
Accessories: Tim Holtz Fades Damask EF, Martha Stewart Silk Ribbon, DIY Porcelain clay (heart pendant), Tattered Angels Marshmallow Shimmer Mist, Pale Yellow Chiffon fabric and sewing machine


Now Closed for prize winnings. Thanks for stopping by.


Tuesday, February 8, 2011

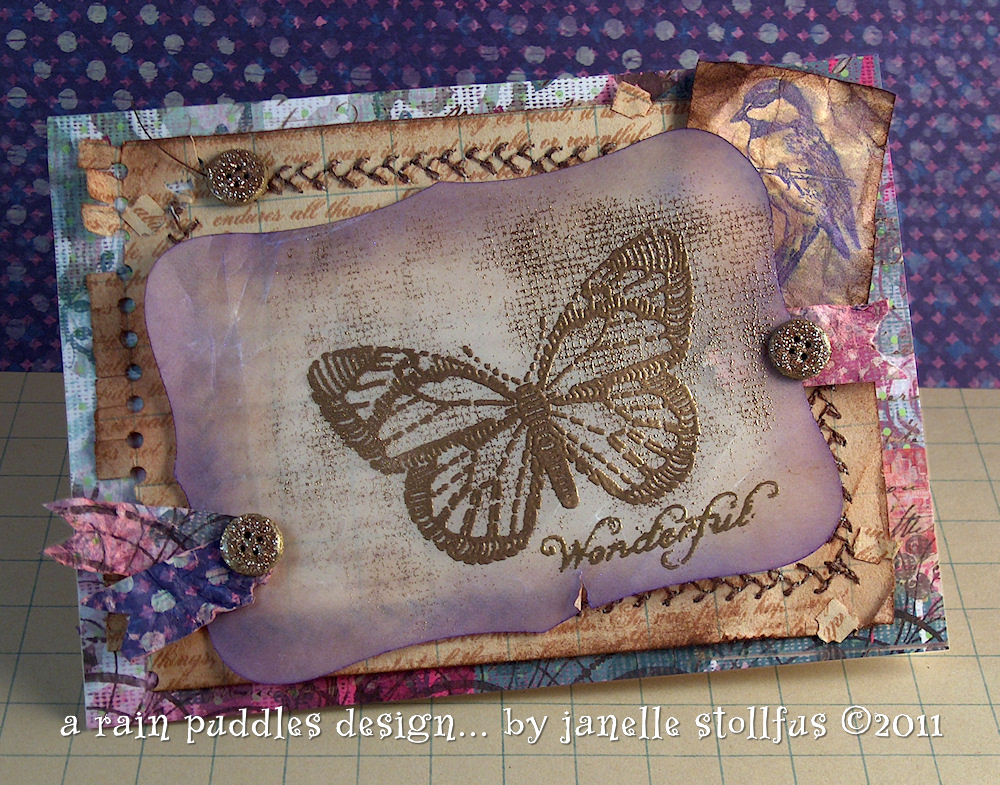
Wonderful Sweet Butterfly


 I was sitting with my children yesterday afternoon watching a new cartoon on PBS called Wild Kratts. They mentioned a few facts about how much a monarch caterpillar eats and compared it to either a human eating the same volume as 2 1/2 elephants or a human would grow to the size of 2 1/2 elephants. I'm fuzzy on the details since I was taking little naps throughout the show. {snort} In either situation I think I'd feel a bit miserable, but that's because I'm human and not destined to be a beautiful fluttering Monarch butterfly.  Nature is a wonderful thing when that consumption turns out to be a beautiful dainty butterfly. I know y' all are dreamin' now.

Anyway, I had made this card starting with the butterfly image that somehow found it's way into my recent order from Layers of Colors. Laura was so sweet to send me the Embroidery Butterfly that I really wanted to create something special to say thanks. Thank you Laura!

I started out trying to make my vellum look like aida cloth with a linen background stamp. It was another happy mistake as I prepped the linen-stamped-vellum with an embossing buddy and disastrously swiped away the ink from the vellum. I shrugged my shoulders and decided to just stamp the butterfly and emboss it anyway, but to my surprise a small amount of embossing powder stuck to the little bit of linen image left on the vellum. It was a shabby style direction for sure. My whole card, save the cardbase, was crumbled, sponged, water damaged and crinkled some more. Too much to describe but it was almost like making a clay pot on a pottery wheel. Way TOO much FUN!

Here are some details from the card showing other art stamps from Layers of Colors.


verse from The Love Chapter on DIY spiral note paper


Backyard Birds


sentiment from Flutterescent and the  Embroidered Butterfly

These stamps are bringing out a new style for me and I must admit that my camera likes taking photos of them. {wink}

Thank you for stopping and seeing my card today!

Details:
Stamps: Embroidered Butterfly, The Love Chapter, Backyard Birds, Flutterescent
Paper: K & Co. Jubilee, cream, graph paper from my mother-in-law's office supplies, vellum
Ink: Lovely Lilac, Ranger distress inks (antiqued linen, tea dye, walnut ink stain), CTMH brown bag
Accessories: Ranger Queen's Gold EP, SU! Gold EP, sewing machine and brown heavy duty thread, DIY spiral note paper edge (Mat Stack template, 1/16-inch hole punch, scissors), DIY glitter buttons (3 button dies in thin chipboard glued together for each button, tacky glue, MS gold glitter, Glossy Accents and metallic gold ink around the edges)

Friday, February 4, 2011

January Viva La Verve's


(unframed art...easier to photo)

I know it's February but I have a project to show that I completed well into the middle of January using the first week sketch from Viva La Verve this year.

The quick story is the following. I overloaded myself with paper flower tutorials and either combined two together or came across a brown sack lunch rolled flower tutorial. In any case, I made a few and wanted to put them on a project. I picked the first Viva La Verve sketch of the year to make a card, but I couldn't possibly put the flowers on a card to mail or even shove into an envelope when the largest one was over 1-inch thick, so I decided I'll frame it in a shadow box. The dry embossed panels were already finished when I decided to frame it so I debated on tossing them and making new ones or to try and position them for a standard 8 x 10 frame. I kept them and found a shadow box frame at Joann's for 10 bucks. yada, yada, yada. Two weeks later it's done. Two weeks further, it's blog posted. :)

Into the details...


I tried all sorts of embellishments for the trio element of the sketch, but nothing seemed to work... so I made some buttons. I used a Quickutz button die (thank you CJ!) on some thin chipboard paper and glued three dies together and sanded around the edges to hide the layers. Then I had just read about a new-to-try technique from the Paper Craft Connections blog (here), so I put it to use on these buttons. I  used some delicious stamp from Layers of Colors to press into the gold embossing powder that was first inked up with Brilliance Graphite Black. My daughter even helped out by stamping as soon as the third layer of embossing was heated.

Added 2/5/11: The instructions from Paper Craft Connections say that you can put some Versamark on your stamp before ink and that creates a release when pressed into the heated embossing powder. Thanks Linda for bringing this up in the comments!


The flowers a three different kinds of paper bag "paper". The medium size flower is from a lunch size paper bag which is thin and took distressing well. The large flower is from brown kraft shipping paper. This paper is thick and porous so when I colored with a misting spay bottle it was very bendable. The third and tiniest flower was made from a thinner kraft paper designated as dust cover paper (think about the paper that covers the back of a framed piece of art...yes this is a leftover from my picture framing business.) It was a happy medium paper that took well to distressing but stayed firm when spritzed with colored water and shimmer mist. Each of the flowers were glittered after they were rolled up by rubbing some clear gel glue with a cotton swab across the distressed edges. The centers are filled with some Quick dry Tacky glue and then sprinkled with Martha Stewart gold and brass microbeads.

Embellishments were added on top of embellishments in stages (because it just didn't look finished). Hand-stitching added to the panels. Seam binding ribbon from Martha Stewart was added on top of brown satin ribbon, then red adhesive back pearls. The sentiment panel was edge distressed and sponged with Ranger vintage photo and Walnut Distress inks. Back to more embellishment with gold cording and a rosette made out of metallic espresso paper. When it was finally framed I could breathe. LOL


Now that it's finished it will be making a home on the wall of our guest bedroom. Thanks for hanging in there with me. Have a great weekend!

Details:
Stamps: Verve Plain Jane Ecc 3:11 and Framed Wishes, Layers of Color Acanthus Leaves (for buttons)
Paper: Kraft cardstock, various kraft paper for flowers including brown sack lunch bag, Espresso metallic cardstock, thin chipboard (for buttons)
Ink: Versa Magic Magic Red, Ranger Distress Denim, Graphite Black, Spica Gold pen
Accessories: Fiskar decorative scissors (rolled flowers), embossing folders, paper piercer and SU! mat kit, Kaisercrafts red pearls, SU gold cording, Martha Stewart glitter, microbeads and brown seam binding ribbon, Ranger Queen's gold embossing powder

Thursday, January 27, 2011

i love you, new toys!


Hi blogging buddies!

You know there is nothing like a new toy to get some creativity flowing and even more when it's a blog hop prize!

I've been drooling over some stamp sets over at Layers of Colors Boutique and I'm certain if I had some extra cash lying around I would buy every one of their stamps. Anyway, I happen to catch their Love Blog Hop on the 17th of this month and I was overwhelmed with gorgeous inspiration. I made a comment on every hop and that just so nicely entered me into a chance to win a stamp prize! And I did, yippee! The Floweret Cling Art Stamp was my prize on Diana's blog.

Now all about my tag, yes I was so inspired I tackled a tag with confidence. I wanted to just play with some different styles with my new stamp, so I grabbed a scrap of kraft paper to test an idea. It turned out so well that I used it as the main image and base of my tag. I first stamped with white ink and tried a No. 2 pencil for shading. I grabbed some paper pastel sticks to color around the image for a background and smeared it with a blending stump. To keep the pastel (chalks) from smearing more I sprayed it with a fixative. (BTW- if you haven't used a fixative before, it will make your paper and pastels look wet and dark, but it dries quickly and back to it's original colors. I've used it many times, but startles me every time I start to spray and see how dark it looks.) The scrap of paper I used had a double embossing from a Sissix Polka Dot folder at the bottom that I had planned to cut away, but then it looked nice with my test image and that's when my experiment turned into a shabby chic tag.


I did order some other stamps set that I'll show on some projects in a few posts from now, but I did use another one on this tag. The Love Chapter is stamped with Creamy Caramel on pattern paper from My Mind's Eye Tres Belle. I trimmed the top and bottom of the pattern paper with some scraps cut out with Tim Holtz' Bracket die and Martha Stewart's Eyelet Lace edge punch, tucking in a basic black PTI jar label for good measure. I framed the floweret image with some more polka dot embossed kraft cardstock by embossing on cardstock larger than the tag so I could position it down in place, then cutting it with the tag edge as my guide. The shabby flower was something I made last year and never used it on a project {blushing}. The flower stamen is a long piece of hemp twine that turns into a stem on the other side. I kept it on and just looped and glued it to the tag. I glued a organdy ribbon bow below the flower as all pretty flowers need one. The last part of the tag is a piece of muslin I stamped with the I Love You stamp and beneath it the verse reference from the "collage" stamp all found in The Love Chapter set. I hole punched the top and ran some cream grosgrain ribbon through it. That's pretty much it!

Have a beautiful evening or day wherever you may be, and as always thanks for stopping by.


Details:
Stamps: Floweret, The Love Chapter
Paper: Kraft, Basic Black, page from old quarterly devotional (flower)
Ink: White Chalk ink pad, paper pastels, a No. 2 pencil and black prismacolor pencil
Accessories: Blue Fixative Spray, Offray grosgrain, hot pink organza ribbon, MS eyelet lace edge punch, Tim Holtz Bracket die, Sissix Polka Dot EF, Nestabilities oval die, hole punch (flower - Marvy flower punch, hemp twine, Ranger walnut ink stain and vintage photo, daisy flower punch, MS glitter, Glossy Accents)