We have continued the weekly Mix-Ability Challenge on Splitcoaststampers even though I haven't been posting here on the blog for a very, very long time. Splitcoaststampers community continues to be a positive source of creativity in my life even if my time is limited for being in the studio.
Here's my thought. What if people out there miss the plain style of gathering and supporting each other in our creative time? I have to take a deep sigh of contentment and then let you know something. If you are curious about stamping, scrapbooking and watercolor. Or if you are in search of a papercrafting community that encourages you and gathers in some simple challenges, we have the place you are looking for!
I join in the mixed media challenge mostly. It's my favorite style of creating when I have a chance. I also have a rotation in the hosting there, too! The first card in this post is one from last Friday where I challenged us to use pennants, buntings or flags.
The next card image is the challenge hosted by MariLynn about bugs!
Stop by and check it out! The details about both of my cards are in my Splitcoaststampers gallery where you will also find the links to the challenges!
Supplies: All the stamping supplies I have used on these cards are retired or discontinued. My go to ink is Clair Nocturne Ink Pad, and the paints I use are almost always DecoArt Traditions.
I'm a maker who receives goodies chosen by myself for design team work. To see a list of these companies just scroll to the bottom of my blog under FTC Declaration.
I went on a little adventure for a few weeks and looked through websites and printables on how to make paint dots swiped on paper turn into a birthday cake with candles, and houses, ghosts or cats. I did so many swipes on my phone trying to find something that would work for the classroom I am an assistant in for free art. I decided I was done swiping on my phone and needed to just start swiping paint on paper!
Some of my first tries were fun and quickly got muddy because I kept trying to fill all the holes. In the end I stayed with primary colors so that wouldn't happen. It ended up looking like a glorious sky, so I went with a silhouette card.
This was definitely worth sharing in a challenge, so I made one! Come and play along, add it to your member gallery with the keywork in the challenge and we'll be able to see it in our challenge gallery.
Supplies: I provide some product links that are through my Amazon Affiliate, and that means when clicked and purchased in the same session a few pennies are sent my way at no cost to you.
Play with dots of tempera paint and a scraping tool, like a squeegee, either using up the paint on the squeegee or new dots of paint. Use lines of paint, just have fun with no method or end in mind. Let dry and then take a look at it to see what it reminds you of then create with it!
I added black cardstock for a horizon and then stamped trees from the S'more stamp set.
Stamp sentiment in Versacolor Pink ink and add embossing powder.
I'm a maker who receives goodies chosen by myself for design team work. To see a list of these companies just scroll to the bottom of my blog under FTC Declaration.
I'm dropping a fun challenge on the blog today, because it has been a while since I've been here and I wanted to share a fun mixed media card from the challenge. I hope you are all doing well, and still getting into the crafting space more than I have been.
I wanted to use the new (to me) Crocheted Mandala embossing folder on my project so I worked around it. Ironically I ended up with only a little strip of it on my card BUT I love the details of the folder.
The rest of the steps are down below in the instructions section. Hope you are inspired to try something like this card or even a technique I used. Have fun!
About supplies;
Find what you have on hand for these supplies and always look for the best price for your needs, but for convenience to you, I spent the time linking products with my Amazon Affiliate account below. This means when clicked and purchased in the same session, a few pennies are sent my way at no cost to you.
Supply List: I provide some product links through my Amazon Affiliate.
I wiped up a previous watercolor mess with commercial paper towel at work, and it looked so pretty I saved it. Mix a bit of red, and orange, and more yellow all over a nonporous surface and then lay the towel down on the wet surface. Dry and keep it handy for a project like this one!
For the challenge it was a bonus to mix your own gold, green gold at that for leprechaun lure. Equal parts were suggested on the internet, of brown and yellow but it took a bit more yellow. I added a smudge of viridian green to give it the green gold.
On a dry watercolor paper towel, make marks with the gold mixed paint. Add whatever else you want like I added white tinted viridian spatters all over and marks with leftover viridian on my palette knife.
Add it to white cardstock card base cut for an A2 envelope, 8-1/2 x 5-1/2 inches folded to 4-1/4 x 5-1/2 inches).
Glue and trim the paper towel to the card base.
Emboss coral cardstock with Crocheted Mandala 3D embossing folder, rub with metallic wax or paint in gold.
Use up the rest of the mixed gold paint on scrap of white cardstock and spatter with white tinted viridian paint.
Monoprint a viridian background paper. Add white and viridian paint to monoplate with roller/brayer. add rubberbands randomly and pull a print on white cardstock, set aside. Add viridian and a few smudges of brown paint to plate and roll it out, laying the first pulled print over the plate and rub around leaving it to soak and dry a bit. Pull when the edge of the plate comes clean of paint.
Start adding torn and cut pieces as desired to the card base. I chose a sentiment from a stamp set that had little flowers that I decided to use. Stamp them in coral and raspberry colors on home kitchen style paper towel ( it soaks in the ink better) and cut out or if you have a matching die that's even better.
Add sentiment and flowers, adding small flowers around the card as needed in coral ink.
Make flower centers with Pale Gold Crystal Drops.
I'm a maker who receives goodies chosen by myself for design team work. To see a list of these companies just scroll to the bottom of my blog under FTC Declaration.
It's been the same amount of weeks between my last two posts. It seems my time in the studio is still being swallowed up by the other hats I wear in life, but I'm hoping I can say that will change soon!
I'm posting today because, yes, I have a Mix-Ability challenge that I'm hosting, but I'm so excited to also have different news to share! First the challenge and a little bit about my card.
This vibrant card, maybe a little exaggerated from my photo editing tool, is used entirely from my stash. Pretty cool when I think about it. I made a bunch of backgrounds way back when I designed for Technique Junkies using Shimmering Bliss sprays and some even more yummy products, a background stamp. The flowers were made up for my design team days with Stampendous which were extras that I couldn't use on a project. The only thing I needed to do was add a sentiment and then make it work for the challenge. Easy peasy.
I chose the Stitch Effort direction and it was fun adding details to the flowers and then making a large stitch border. I'm so glad I did that so it wouldn't take so long to hand stitch.
Stop on over at Splitcoaststampers Mix-Ability forum to check out the challenge.
Supplies and where to find them are at the bottom of the post and now for my little bit of news!
I have recently been added to the Splitcoaststampers Dirty Dozen Team! This has been a dream come true for me and I couldn't be more excited and grateful at the same time. The SCS community nurtured my love for stamping and being a positive contributor to not only that wonderful environment but also to the every day around me.
I'm still figuring out the ropes, but expect to see some more activity from me while I do my best to encourage all those who call papercrafting their homeostasis.😀
Supplies: I provide some product links that are through my Amazon Affiliate, and that means when clicked and purchased in the same session a few pennies are sent my way at no cost to you.
I'm a maker who receives goodies chosen by myself for design team work. To see a list of these companies just scroll to the bottom of my blog under FTC Declaration.
The weather is getting cooler and while I don't drink Pumpkin Spice Latte's anymore I can certainly make a likeness to it on a card!
I'm hosting the challenge again on Splitcoaststampers. While I was looking through my inspiration list for challenge options, I decided to see what may coincide around the world, or at least closely, and I found out that September 22 is 100 days from the end of the year!
There are more things on my to-do list than just cardmaking, but I had decided it was far too long since I did some prioritizing of my list and put creating in my studio closer to the top. Well, I was on a deadline to host the challenge so I did have it high on my list, but I intentionally did things that were personally something I wanted to try or do. And that's how the 556th challenge was born.
My cards checkmark off my list 1) doing a video tutorial, 2) making a stamp set worth of sentiments to have handy, 3) having seasonal backgrounds ready for last minute cards, 4) using some brand new months ago embossing folders, and 5) using some coffee dies!
The background on the "Thankful for You" card was made using Distress Inks and a tutorial by Vicky Boutin during SBF 2023 in September. Go check out that festival. It's full of ideas and supply must-haves (my package is coming!)
The stamp and die-cut sentiments all at once have appealed to me for quite a long time, so when I saw a Hero Art set at my favorite liquidation store (which has closed everywhere, I think) that included both stamps and dies you know I had to get it! The set is called Friendly Messages.
Then it was time to use some supplies I've had so long I don't remember when I got them, but I remember where! My beloved Tuesday Morning store that now no longer exists.
The Fabulous Day Latte card was easy and so much fun! Run a piece of kraft cardstock through the embossing folder and gently rub smoke and citron inks over the raised areas. Make a unique pattern paper for the cup with Marmalade Distress inks and spattered water patted away then add some Forest Moss spatters by watering down ink smudged on a glass surface or nonporous palette with a paintbrush. Blend Forest Moss and Twisted Citron to die cut into the cup sleeve. Die-cut a lid and you're ready to assemble. Oh yes, the sentiment? It was already done when making the first card!
If you want to start mixed media in a simple and approachable way, stop by the Mix-
ability challenge forum and start with any challenge, any time! Here's the challenge for these cards.
Supplies: I provide some product links that are through my Amazon Affiliate, and that means when clicked and purchased in the same session a few pennies are sent my way at no cost to you.
Thankful for You, card
Featured Product(s):
Hero Arts Friendly Messages Die and Stamp Bundle (AZ, SB)
I'm a maker who receives goodies chosen by myself for design team work. To see a list of these companies just scroll to the bottom of my blog under FTC Declaration.
The wonderful community of paper crafters and makers who "live" at Splitcoaststampers are the best! I don't have much time to craft this summer, really at all these past few years, but when I do and post them in my Member Gallery it makes my day! The challenges and events that go on throughout the year are widespread and have so much to offer. If you haven't stopped by there and had a look around you should go check it out!
What is even more of a treat is to be a part of the challenge host in the Mix-Ability forum. I'm so tickled every time I jump in there and challenge myself and others to get in my mixed media mindset.
My last turn I completely forgot! The super sweet host MariLynn jumped in with a challenge to saved the day since I was distracted with my graduating daughter's events. Take a peek in the forum for any and all challenges here
My modern twist on cyanotype is with mono-printing and die cuts! Nothing new for a paper crafter, but I did mix my own version of Prussian Blue paint. Amazingly the same paint was used for my two samples. It's the difference between laying it down thick and then using what little you have left for a light see-through layer.
I used my vast knowledge of mixing paints my whole life... hah!, and just searched for "how to mix Prussian Blue acrylic paint". Not going to lie, I was in a last-minute hurry with this project and didn't have time to discover the mixture myself.
I used my memory retrieval of Birgit Koopsen's reels(Instagram) on the simple use of stencils as masks. If you wanted to get closer to a look of cyanotype you might try her use of printed magazine pages. Take a look at that technique on the Gelli Plate blog.
Supplies: I provide some product links that are through my Amazon Affiliate, and that means when clicked and purchased in the same session a few pennies are sent my way at no cost to you.
I'm a maker who receives goodies chosen by myself for design teamwork. To see a list of these companies just scroll to the bottom of my blog under FTC Declaration.
MIX412 Sample using Hare In A Hurry and Celebrate Birthday
MIX364 Sample using
Cling Dahlia Collage and
Quest Texture Cube
It's time to reveal a little more about my journey, if you're curious read on. For an explanation of the cards in this post, go to the end of the post.
In over a year I've scaled back my crafting to essentials and focused on the health of my neck, back and nutritionally everything. Years ago I tore the cartilage in my hip, had surgery and did barely nothing to get myself back to better than before the injury. About the same time I had severe neck pain that caused reference pain and numbing down to the hand on my dominate side, the side that I use to write, draw, blowdry my hair, etc. I used all my energy and effort to take care of my family and do stamped greeting cards for the design teams I was on. It was a crazy cycle that I didn't know how to end. I just couldn't imagine leaving the hobby that I love to make my body healthier because stamping made my mental health happy, or so I thought. It began to drag me down in every aspect. I tried physical therapy and exercise to get my physical aspect better but repeatedly hurt myself and was setback to the beginning of my efforts.
It’s now 2023 and I’ve continued towards better health. Shedding weight through a program called Code Red Lifestyle with improved diet and getting pass a lot of hurdles with my body joints, I’m able to do more and more crafting.
Hopefully you can enjoy some of my cards from the past years that I wasn’t able to post or did post only on my member gallery on Splitcoaststampers.
MIX404 using Bring To Life
MIX404 using Little Monsters
Have a super day crafting, making or just relaxing!
I'm a maker who receives goodies chosen by myself for design team work. To see a list of these companies just scroll to the bottom of my blog under FTC Declaration.
It's a weird feeling to say it is December and weeks away from 2023. And even more to look back and see just how few posts I've done. My health is doing better, and my crafting space is almost ready to be moved into for the second time (a long story that I may or may not have mentioned in previous posts).
Aside from all of that, I'm glad to be able to say I'm still hosting in Splitcoaststampers Mix-Ability challenge and today is my challenge. It always seems like I'm trying to find a quiet and serene place to recharge during the last three months of the year, so I decided to make it part of the challenge.
I did a search for winter sky watercolor and did a tutorial which came out really not good, so I searched again and found this tutorial by Projects with Kids, and it was E.A.S.Y. easy. Give it a try!
Supplies: I provide some product links that are through my Amazon Affiliate, and that means when clicked and purchased in the same session, a few pennies are sent my way at no cost to you.
I grabbed some old linen texture cardstock and traced around the bottom of a paint bottle for the moon. I used that as my guide to making the blue shade of rings, slightly blending the transitions. Then a quick spattering of watered-down white paint over the moon sky and set it aside to dry. I stamped the trees twice from Let It Snow and cut them out with scissors and a craft knife. The sentiment is from The Best Gift of All originally as a 3-line sentiment, but with the help of scrap paper for masks and my MISTI tool, I turned it into a 1-line sentiment.
That's about it. Enjoy your crafting time, and we'll see you again... probably for the next Mix-Ability challenge!
I'm a maker who receives goodies chosen by myself for design teamwork. To see a list of these companies, just scroll to the bottom of my blog under FTC Declaration.
It's fall in my area, and I'm struggling between the fun bright colors of summer and the brilliant shades of fall, but somehow I managed to grab a set of muted pastels for today's project, and it came out better than I had wished!
I'm sharing this project with a celebration of a crafting company that has decided to close its doors after 10 amazing years of products and community! Reverse Confetti's Choose Joy and coordinating Confetti Cuts are front and center on my card and it was so much fun to put together!
This card is a challenge card for Splitcoaststampers Mix-Ability Forum, and it starts on Friday with MIX508 Common Thread or Knot!
Supplies: I provide some product links that are through my Amazon Affiliate, and that means when clicked and purchased in the same session, a few pennies are sent my way at no cost to you.
I'm a maker who receives goodies chosen by myself for design teamwork. To see a list of these companies, just scroll to the bottom of my blog under FTC Declaration.
Hooray! It's Friday! And it's a new Mix-Ability challenge on Splitcoaststampers! Lots of exclamations so far in this post because it is a BIG deal! The challenge has hit its 500th challenge, and we are celebrating with the 5-0-0 up all over the gallery and internet!
A post from all of the Mix-Ability hostess can be read here. It’s so interesting to read how each of us decided to lead a challenge.
I have two cards to share today. The first one has some of my very favorite monoprinted and freestyle background paper. The sentiment is made with Lawn Fawn's Giant Hooray die on cardstock painted with metallic gold paint. Pretty much a party on a card!
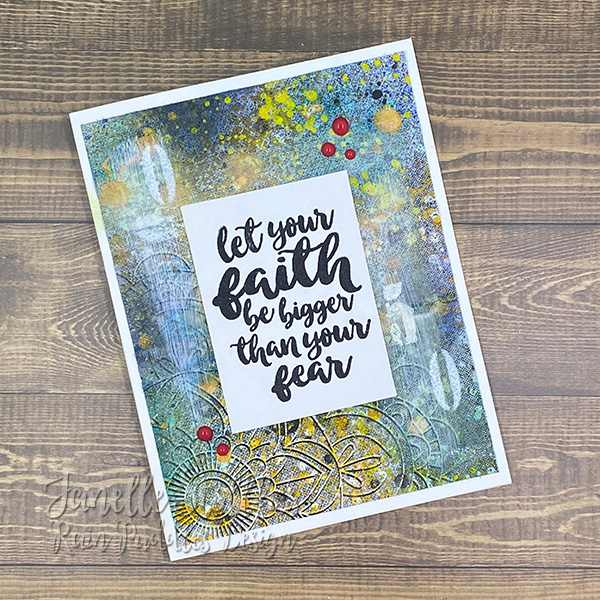
The other card is a lot of fun because I started with a printer printout background and added paint layers. The sentiment is from a super sweet photopolymer set by Jane's Doodles called "You've Got This." By this posting, it is sold out, bummer, but there are a ton more adorable and fun options on their website.
Come on over to Splitcoaststampers and join in any challenge for a super fun crafty community at any time.
I'm a maker who receives goodies chosen by myself for design teamwork. To see a list of these companies, scroll to the bottom of my blog under FTC Declaration.
I'm stopping in so randomly, but I want to share with you a fun technique and a challenge!
I came across this mixed media technique called Leaf Stamp Art, go try it out! I added some spatters to make it more spontaneous for my card.
Now the reason for my card is a new challenge! I'm hosting the Mix-Ability Challenge on Splitcoaststampers forum. It's a great chance to try a bit of mixed media and turn it into a little gift to mail to a friend!
I confess, I’ve been on low-profile mode for a very long time, it’s obvious with my supply list, but I stopped by Your Next Stamp blog and saw they had a link party! Please drop over there to look at the gallery and check out the newest release. Their bubble gum cat is adorable!!
That's it from me! Enjoy your weekend and get crafty if you can!
Supplies: I provide some product links that are through my Amazon Affiliate, and that means when clicked and purchased in the same session a few pennies are sent my way at no cost to you.
I'm a maker who receives goodies chosen by myself for design teamwork. To see a list of these companies just scroll to the bottom of my blog under FTC Declaration.
Hi friends! I was so fortunate to drop into my art studio and get some fun sentiment cards done. It just gives me warm fuzzies when I can do that. Today these cards are for the Splitcoaststampers challenge forum, Mix-Ability!
I have three cards to share that came together rather quickly for two reasons. I have a pile of monoprints ready to use and three new die cuts that I was so happy to get at a local, walk-in-the-door craft store! I'm so glad they are still open!
Lawn Fawn has quite a few "Giant" Lawn Cuts that make for a jiffy card session. I have Giant Sending Big Hugs, Giant Thank You, and Giant Happy Birthday.
Each one of my cards attempts to create a vignette. I say attempt because art and mixed media specifically can be jolted into different directions.
Sending Big Hugs is a monoprint on deli paper inspired by the amazingly talented Birgit Koopsen. I made a vignette or transition by painting whirling lines. I meant to cut the paper along the lines, but when I realized I was gluing my layer on the base I had already cut it into a rectangle.
Thank you is a transition with simple lines to hide the abrupt edge of the bubble background mat layer. That background is from when I hosted the MIX468 challenge. It isn't noticeable in the photo but I used Spectrum Noir Sparkle Brush Pens so it twinkles it's Thank You.
Happy Birthday is another monoprint that I did for a challenge and loved it but needed to wait for the right card to use it. I believe it's from the MIX460 challenge and just trying to play with brush strokes.
Supplies: I provide some product links that are through my Amazon Affiliate, and that means when clicked and purchased in the same session a few pennies are sent my way at no cost to you.
I'm a maker who receives goodies chosen by myself for design team work. To see a list of these companies just scroll to the bottom of my blog under FTC Declaration.
Happy New Year, everyone! I've been working on projects around my house, still living in the same crazy boxed-up craft studio while a very long process of remodeling and moving rooms around our house.
Even though my situation is a little less than desired, I'm still happy to have what I have access to, and that ever so often I'm fortunate to be the hostess of the most fun challenge on Splitcoaststampers. Today I'll be sharing a photo tutorial of a new find on Youtube. I'll tell you the source in a bit, but here is my photo summary for papercrafters! Look at the bottom of the post for links to products involved in the card above.
I followed the video instructions and made lines for my planks with pencil and rulers. I made it easy on myself and did 1-inch width planks and centered them on a 4-1/4 x 5-1/2 inch white cardstock.
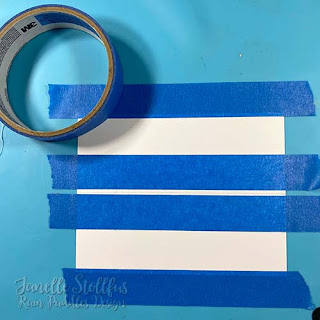
Again from the video, I taped off two planks. It helped keep my paper in one place.
As with the video, I layered my paint but realized I needed to work fast with the base color because it soaks into the paper FAST!
Once the first two colors were down with a flat brush, I grabbed a stiff bristle stencil brush (#4 size) and made a knot by twisting the brush in a spot along the plank. Moving quickly, use the stencil brush to create the grain.
Now here is the paint sequence I used.
DecoArt paint from left to right is Lamp Black, Burnt Umber, Antique White, Milk Chocolate.
Start with Antique White.
Roughly add Milk Chocolate.
In smaller, more sparse amount is Burnt Umber. and spread roughly around.
Quickly pick up the stiff bristle brush, twist a wood knot along the plank, and then make grain lines across and around the knot. The paint will be dry in spots, but don't worry about it. You can add more paint layers if you want and do more grain lines.
A small brush loaded with a mix of Burnt Umber and Lamp Black is brushed along the tape and a little bit across the plank. Keep reading before starting this step.
In small sections apply the mixed paint and then go back and rub it into the edge of the tape so there isn't a hard edge on the plank. If the paint dries too quickly rinse your brush and paint water to lift the paint and then smudge it for some transparency. What is up against the tape will create a hard edge for the plank.
What is up against the tape will create a hard edge for the plank.
NOW... this amazing video that I talked about is by Kayla of Kayla's Creative Corner. If you try it out, please give her all the credit. It's a genius and easy method for faux wood grain.
Want something a little more weathered-looking? I tried it and was pleasantly surprised to use Craftsmart Tan as the base, Craftsmart Suede, and a mix of Suede and Black as the top layers. Voila!
Now if you play on Splitcoaststampers join in the challenge
Supplies: I provide some product links that are through my Amazon Affiliate, and that means when clicked and purchased in the same session a few pennies are sent my way at no cost to you.
Featured Product(s):
DecoArt Lamp Black (AZ), Burnt Umber (AZ), Antique White (AZ), Milk Chocolate (AZ)
I'm a maker who receives goodies chosen by myself for design team work. To see a list of these companies just scroll to the bottom of my blog under FTC Declaration.