
Holiday Selfie Journal Time


There are very few times I have created an art journal page. I think it's just my perception of the old secret diary remaining a secret that keeps me from exploring the rather cool world of art journals. Someday I'll overcome it and you will be getting plenty of your share of my "secrets" in journaling with paint and whatever else I can find to use.

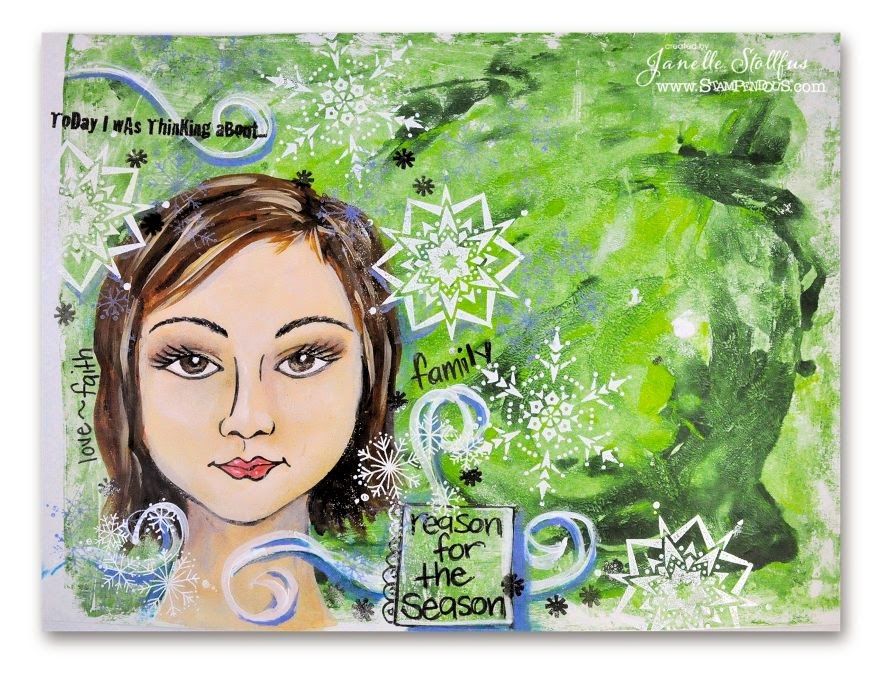
Even so, I'm here with a journal layout. I say layout because it's just a sheet of paper that I, if successful, will glue into a journal and a date added to it. The layout is for the current Mix-Ability challenge on Splitcoaststampers. It just seems appropriate that their be a journal page for the MIX99: Holiday Selfie theme.

I didn't think to photograph my steps to create this, but I'll try and guide you through as best as I can.

Supplies:

From Stampendous:
Blossom Beauty Stamp Set
Creative Palette Monoprinting Plate
Jumbo Snowflake Trio (Retired), alternate set: Delicate Snow)
Winter Snow Stamp
Journal Lines
Detail White Embossing Powder
Versafine Onyx Black ink by Tsukineko®
Versamark Watermark ink by Tsukineko®

Plus:
White Sulphite Paper (Pacon)
Acrylic Paint by Liquitex®
White Gesso by DecoArt®
Zip-Dry Glue by Beacon Adhesives®
Black Brush Pen by Prismacolor
Water-soluble oil pastels
Acrylic paint marker
Stamp Positioner Tool

Instructions:

  1. Create a monoprint with two shades of green on the Creative Palette. Create more than one print from the first ink so you have extra for layering and sentiments. Let them dry completely.
  2. Open up the Blossom Beauty Stamp set and remove the free template. Pop out the head shaped mask and set aside. Using the remaining template, tape down onto monoprint and paint white gesso onto the head shape. Let it dry and repeat if gesso is transparent.
  3. Add the template back onto the gesso area and use flesh paint color of choice. Let dry.
  4. Remove template and add head shape mask with the eye area masks removed.
  5. Add gesso tot he eye area and let dry.
  6. Ink up face stamp from Blossom Beauty with Onyx Black ink and stamp using a stamp positioner to align the stamp over head shape area.
  7. Paint highlights and shadows onto face.
  8. With the top of the head shape as the hairline guide paint freestyle hair of choice in color and length. Let dry completely. (Optional: Use the free hair templates downloads on Stampendous website)
  9. Paint swirls around the face image.
  10. Stamp snowflakes with Versamark Watermark ink and emboss with Detail White embossing powder.
  11. Stamp sentiment from Journal Lines above face and then randomly stamp asterisk from same set around the layout.
  12. Add handwritten words.
  13. Let dry and glue into journal.

Pin It

Comments

  1. Great page and love all that green! Wonderfully done and I'm sure you had a great time making it. Wishing you a blessed Christams ((hugs))!

    ReplyDelete

Post a Comment

Thanks for stopping in today and leaving me a comment! It brightens up my day!

I moderate all of your lovely comments, so if you don't see yours publish right away it's in my Inbox waiting to be read.

Have a wonderful day!

Popular posts from this blog

Let's Celebrate Plain Jane Style!

There is an Anni-Verve-Sary party going on today! Verve Stamp Company is 2 years old! The hop started at Verve's blog , so come hop on board and see over 5 dozen projects that are sure to get your Verve on! I've been waiting for the right time to blog about this project and when the opportunity came to join in the anniversary blog hop for Verve I knew it was time. My blog hop project today uses all Plain Jane Bible verses from Verve. I saw this project at Susan Roberts gallery on Splitcoaststampers and went to her blog to get the details . I decided to make one for my mother as a Christmas present...in 2008. Yep, I just now finished it and I have the blog hop to thank. Using sketches would have made this a whole lot faster. LOL The two cards shown in the picture above use the latest Plain Jane release for Psalm 121:1-2 (hanging on box) and Hebrews 11:1 (in front of box). And I'll give the details below, but first here's a slide show of the whole year. Hebr...

Friends Purge Hop 2012

A few blogging friends of mine are having a hard time letting go of much loved papers and embellishments, so we decided to share them with all of you in a week long Purge Hop!  If you’ve already been hopping along you have come from Julee’s blog , but if you are starting here just look at the list below for all the links to before and after to get in on all the fun. Just comment once on the hop spots you want a chance to win and tell us what you spy as your favorite item(s). The hop will stay open until January 28th, 5PM ET. Each of my friends will post a winner from their prize post on Monday, January 30th!       1. Tosha 6.  Julee     2.  Andrea 7.  Janelle     3.  Maureen 8.  Betty     4.  Sonja 9.  Teresa     5.  Laurie Here's my treasured supplies I'm willing to give away!  Numerous 6 x 6 sheets of scrapbook paper from these ...

Stampendous New Products - CLOSED

The winner is announced on this post . Mark your calendar to join the Stampendous Design Team next Saturday, for a fun blog hop, complete with prizes you don't want to miss.  We'll be showcasing all sorts of products just released at Winter CHA! Welcome Second Annual Scrappy Bowl Party! Thanks so much for popping in to see my Scrappy project using some new Essentials by Stampendous! As our team is getting ready for the blog hop this coming Saturday I wanted to give you a sneak peek of a new product. It's gonna knock your socks off! The new Color Fragments are so much fun to work with and have so much versatility. The technique I used for this journal cover is the Encrusted Jewels Technique  (video). Color Fragments are sprinkled over Deep Impressions Embossing Powder along with Shabby Blue Embossing Enamel and heat set from the back of the project. (That's just so the fragments don't soar off the page and to the floor.) Now for the Sc...