Featured Post

Rain Puddles Design Privacy Policy (Click for entire post)

I'm working on a new privacy policy for my followers, but for now, you should know that if you comment on my site, my site collects da...

Showing posts with label Gifts. Show all posts

Friday, March 6, 2015

Welcome Home Treat Box


It's a wrap on the theme week for Stampendous' Home Sweet Home and I pulled this fun little treat box together because I just needed to get it out of my head!

I saw this gable box die at a local scrapbook store in The Dalles called Urban Paper (THE SWEETEST owner, Jill, has such a fun shop) last weekend and knowing what this week's theme was I really wanted to create a welcome home box. You know, one that you could quickly put together as a gift for a new neighbor or even someone from your own family, especially when you don't have time to run out and grab something?


It has a few houses with the lights out on it, but there is ONE that has all the lights on waiting to welcome you home. It's also sporting a popped up elevation for MariLynn's challenge on the Mix-Ability challenge this week, MIX110: Pop It Up!

Here are the instructions to create this sweet little box.

Supplies:

From Stampendous:
SSC1219 Family Home
STF082 Versafine™ Onyx Black Ink by Tsukineko®
CP811 Creative Palette MonoPrinting Plate
MPW811 Mixed Media White Paper

Plus:
Cardstock by Wausau®
Acrylic Paints by DecoArt®
Prismacolor™ Color Pencils
Zip-Dry™ Paper Glue by Beacon Adhesives®
PITT Artist India Ink Black Pen by Faber-Castell®
Thin 3D Foam Squares by Scrapbook Adhesives by 3L®
Ribbon
Treat Box by Sizzix

Instructions:


  1. Create a box using instructions from the treat box packaging. Keep flatten.
  2. Stamp house duo from Family Home set with Onyx Black ink onto long panel side of box. 
  3. Color in larger house with black pen.
  4. Color sky with colored pencils and smooth with odorless mineral spirits or leave as is.
  5. Stamp houses onto premade monoprint paper and trim out. Separate the two houses and glue one down with foam squares, the other with liquid glue.
  6. Stamp sentiment and frame with monoprint paper scrap. Glue onto front of treat box.
  7. Fold up box and tie ribbon through top of box.
Thank you for stopping by! Check out a few more projects on the Stampendous blog and join the mixers for some Pop It Up fun this week in the newest Mix-Ability challenge.


Pin It

Wednesday, November 20, 2013

November Diva Dare to "Shape Up" your Project


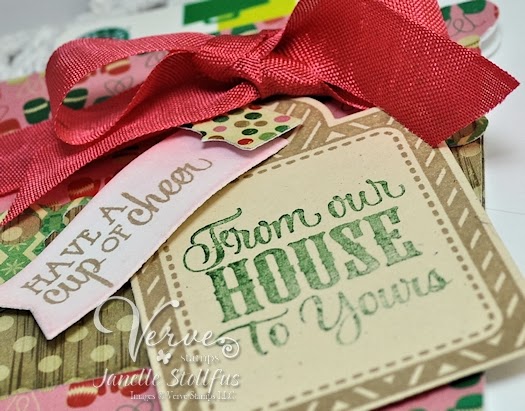
I'm sharing my take on the Diva Dare Challenge this month, to "Shape Up" your project. Here's a photo gallery of my project and if you want the details of the challenge head on over to The Verve Stamps blog today for more information.


Verve goodies are adding a sweet touch to this shaped gift card holder. Check out the end of this post for product details.

For the shape of the card I used my Pazzles Inspiration Cutter. I've been using that for many, many projects this last month. I'm afraid it'll call in sick one of these days.

Here's the technical steps for taking a single shape and magically changing it so you can create a shaped card base. Of course you can always just use two single shapes and glue them together on one edge for a shape card, too.


Using the options in my Inspiration Cutter software here are the steps to go along with the image above.

(1) Mirror and Duplicate the shape. (2) Rotate the shape. (3) Align both shapes so they barely touch at the bottom. (4) Rotate both of them so they have a new baseline. (5) Open path on the inside of the shapes  and delete solid lines. (6) Create new cut and kiss cut lines between them. The kiss cut lines will help fold the card.

Now for the gallery...


All this goodness fits into an A2 envelope for mailing out to friends across the miles or those right next door.

If you're further interested in getting a cutting machine, please visit the Pazzles store through my affiliate link. That way they will know I sent you. :)

Details:
Stamps: Holiday Treats (Verve Stamps)
Paper: Bundled Up (Crate Paper), white and Balsa cardstock (Neenah)
Ink: Crumb Cake and Garden Green (Stampin' Up)
Accessories: A Cut Above Dies: Cup of Cheer, Flag It, Award Banner Trim, Tagged Rectangle (Verve Stamps), Grapefruit Seam Binding Ribbon (Truly Madly Deeply Ribbon Collection (Verve Stamps), Pazzles Inspiration Cutter and Latte Library File

Pin It

Monday, October 29, 2012

Holiday Gift Giving

Good morning to many and to those on the east coast I pray your home, family and friends are prepared for what nature is throwing your way. I'll be thinking specially of my design teammates that have mentioned all the preparations and the uncertainty the comes from hurricane weather.

I'm bringing my last Fabulous Floral challenge project to you today. There are only a few more days to play along before the new challenge is introduced on Saturday over at the Stampendous blog.

For the July catalog, I attempted to make a holiday decorated bag. The result was beautiful in real life, but when you go to take pictures of items that are larger than your light box and mostly black against white, the result is a little less spectacular. I wanted to show off the Jumbo Poinsettia in a non-traditional color so here it is. The whole bag. :)

The poinsettia is embossed with Midnight Black Embossing Powder and then colored with a darker shade of marker than the paper. After that, I sprinkled Aged Gold Embossing Enamel over the center of the flower. The last step is a few drops of Zip Dry glue in the center and cover it with Fun Flock from the Over the Rainbow kit.


During the holidays, you can never be without gift tags, so I cut out a few with a die cut (sorry I don't know the source for this one since it was gifted to me) and repeated all the steps. Lots of fun contrast and glimmer. A few thin strips of May Arts ribbon and button thread finish off these great little tags. Make extra for friends. They might use one on your holiday giftie!

Link up to the Fabulous Floral Party with your flower creation. Using Stampendous only doubles your chances of the challenge prize (but not required).

Note: At the time of each post I check the online store for their products. If it is not available in the store (it's a popular item!), then I'll direct you to a place where you can find a store in your area. This means you should be able to find these products at most local crafting stores or online.
Details:
Stamps: Jumbo Poinsettia Set (Stampendous)
Paper: Teal Textured cardstock (Bazzill), black gift bag
Ink: Versamark Watermark Stamp Pad (Tsukineko), Copic Markers
Accessories: Aged Teal Embossing Enamel (Stampendous), Midnight Black Embossing Powder (Stampendous), Over the Rainbow kit (Stampendous), ribbon (May Arts)

Pin It

Sunday, September 23, 2012

Fall into Fall with Flair Week on Paper Craft Planet


The week of Zva Creative inspired projects is wrapping up today with my post over on Paper Craft Planet. Just in case you think the rhinestone flourishes I'm using on my projects are a must have in your stash, head on over to the Planet blog to find out how to win them.

I created a photo frame just like the old fashion portraits used to arrive from the photographer. I've added my own style to the outside just for that special gift someone might receive this Christmas. I stamped the largest frame from the Vintage Frames set in watermark ink and embossed with Vintage Lilac Tinsel Embossing Powder. I went back over the center of the frame with Aged Wine Embossing Enamel and heated from the back side of the piece then fussy cut around the outside. The sentiment from Cherub Wishes was stamped in Onyx Black and bordered with another stamp from Vintage Frames also embossed with Vintage Lilac. The sentiment is popped up with foam dots and those fabulous flourishes of bling were added from Zva Creative.


The frame is really easy to make using some acetate on the window of the frame so you can slide out the photo for another one later on (but seriously, I think this frame was made for that sweet photo of my daughter).


The frame can be folded up and closed just like the vintage ones I've found in my father's house last fall. here's a close up of the closure.

You can also get in on the Stampendous monthly challenge to emboss with powders! Details are on the Stampendous blog where you can add your project to the link list!

Details:
Stamps: Vintage Frames (Stampendous), Cherub Wishes (Stampendous)
Paper: Strathmore Sample Pad (from a long time ago), clear acetate
Ink: Versamark Watermark Pad, and Onyx Black Ink (Tsukineko)
Accessories: Gem Flourishes (Zva Creative), Vintage Lilac Tinsel Embossing Powder and Aged Wine Embossing Enamel (Stampendous), tacky tape, Score board (Martha Stewart), utility knife, eyelet hole punch


Pin It

Saturday, September 15, 2012

Ready for Holiday Gift Giving


It's the big Saturday Handmade Gifts Hop with Stampendous and the designers! I'm second in the hop so you've probably come from Cyndi's blog and please start at the beginning if you just happened on to this post. Throughout the week you've had a chance at some prizes, because it's just not a party otherwise, and it's the same for today! There will be THREE prize winners today for those that comment along the hop. You can find out the winner's on Monday over on the Stampendous Blog

It's pretty hard to come up with a different way to give a gift these days, so I'm combining a couple ideas. I have a few people in my life that live on the lean side of life. They don't want or need a whole lot of material things in their life so it can make for a hard decision on what gift I give for them.

So I went with small scale table decorations. Something that could brighten up their small space and be practical. A small poinsettia print flower tea light. Here's a string of photos to show how this tealight went together.

HomemadeGifts_02 HomemadeGifts_03
Draw a spiral scallop flower on vellum.
Stamp background stamp on the other side.
HomemadeGifts_04b HomemadeGifts_05
Spread embossing enamel across stamped image, tap off and heat from the back side of vellum.
Add some Scarlet glass glitter over the melted top of a tealight with a heat gun. Trace leaf shapes on green cardstock.
HomemadeGifts_06 HomemadeGifts_06b
Cut out two leaf shapes and crimp cardstock. Adhere two cardstock layers with tacky tape.
Cut out spiral scallop flower leaving a center the same size as the tealight.
HomemadeGifts_07 HomemadeGifts_08
Add center of vellum to the bottom of the tealight and again to the stacked leaf shapes.

Wrap embossed scallop around the tealight, crumpling and bending petals.
HomemadeGifts_09
Glue down end of scallop strip with Zip-Dry Paper Adhesive.

Your next inspiration stop is with Krissy, and if you should get lost somewhere on the hop here is the master list.


More gift giving ideas from past posts.

Details:
Stamps: Poinsettia Background (Stampendous)
Paper: Vellum, green cardstock
Ink: any slow drying ink so the embossing powder will stick to the stamped pattern
Accessories: Aged Scarlet Embossing Enamel (Stampendous), Red Glass Glitter (Stampendous), Zip Dry Paper Glue by Beacon Adhesives, paper crimper, tacky tape

Pin It

Tuesday, September 11, 2012

Homemade Gifts with Stampendous


This week the Stampendous Design Team is bringing Homemade gift ideas to your doorstep. The holidays are just around the block and we want you all to have some ideas up your sleeves.

Today Wendy Jordan and I have the stage, so be sure to stop by her blog too! There will be prizes so be sure to comment as well!

I combined some of the best ways to create a gift, the most traditional ones. The key to making this quick is to use Stampendous Jumbo sets with the Background Stamps. Let's jump through my idea, shall we?


I made a purse sized calendar with a pencil included. :) The cover is stamped with the Jumbo Dogwood and quickly colored with three Copic marker colors. Then some dabbling of Zip-Dry glue  in the centers to add some Fun Flock from the Over the Rainbow Flock and Glitter Kit by Stampendous. While that was drying I made a mask by stamping onto a large sticky note and cutting it out. I added the mask and then stamped the Lacey Background stamp with VersaMark Watermark pad and sprinkled Topaz PearLustre Powder after removing the mask. Heat emboss with a heat tool. The sentiment is from the Garden Beauty Perfectly Clear Stamp Set, stamped in Tuxedo Black ink by Tsukineko, framed with black cardstock and popped up to allow space for the Woven Burlap ribbon to tie it closed.

For the inside, I grabbed a free 2013 calendar and reduced it by about 49% so that it would fit into an A6 (4 1/2 x 6 1/4 inch card). I kept the printouts stacked and just cut them excess paper off with a utility knife and straight edge ruler (yes, my see-through one). I divided them into four sets and ran my perforating blade on my Rotary handle cutter across the top of each one and then put them all back together with a couple of staples. They are forever adhered to the inside with i {heart} papers, tacky tape. For the pencil holder, I folded up some more cardstock and glued it down just low enough from the top fold to keep the pencil from falling out while closed. The cover base is 6 1/2 inches by 9 inches and scored across the middle at the 4 1/2 and 4 3/4 inch marks. When folded it will be an A6 size card. Slide it into an envelope and mail it out for a gift. Voila!


Now it's time to hop on over to Wendy's blog or if you came from her blog hop on over to Stampendous' blog.


Details:
Stamps: Garden Beauty (Stampendous), Lacey Background (Stampendous), Jumbo Dogwood (Stampendous)
Paper: Kraft (Wausau), Cream (Wausau), Black (Hobby Lobby)
Ink: Tuxedo Black (Memento, Tsukineko), Versamark Watermark Pad (Tsukineko), Copic Markers
Accessories: Over the Rainbow Kit (Stampendous), Topaz PearLustre Powder (Stampendous), Woven Burlap ribbon (May Arts), tacky tape (I {heart} papers), dimensional adhesive dots, score board (Martha Stewart)


Pin It

Saturday, May 5, 2012

New Month, new challenge for Stampendous fans!


Good morning! I hope you are having a wonderful National Scrapbooking Day today. Some of us designers want to share a layout with you all just for the occasion and you might see them as you hop through our blog list today for... a new month challenge and hop with the Stampendous Design Team. We are getting prepared for spring gift-giving this month. If you have graduates, weddings, birthdays, teachers, or all of the above let's get creative with our giving.

I've got some teacher's in mind for this idea. Mind you I'm doing them for my children's teacher's and not for the mass PTO Teacher Appreciation gifts. Although, it might be possible given enough time.


I bought five fancy bars of fragrant soaps and sliced them into guest size bars for a sample package. I found these soaps at a new store in the area which I think are the best smelling cleansers, whoa! I have my favorites, but I'm not going to say what they are.

A lady for the Corset Ladies set is framed from a Vintage Frame stamp and fussy cut out. It has been popped up on top of an oval circle cut from an adorable paper from Echo Park's This and That paper pad. While the die cut was still hugging the diecut I used the inside rim as a ruler and added VersaMark so I could emboss a border with Aged Gold Embossing Enamel. The sentiment is from Friendship Assortment and stamped and embossed to match the Corset Lady. I wrapped and wrapped the slices of soap then wrapped some more with a strip of Chocolate cardstock and trimmed with some vintage ribbon (thanks Lori). Some more wrapping with vintage seam binding (thanks Lori) that I colored the edges with RV10. I tucked my oval piece under the seam binding and popped up the image and sentiment.

Now there is more to inspire you today. Jump on over to Melinda's blog and check out how she took the challenge. Here is the master list

Janelle Stollfus

And we want YOU to play along with us!  Simply make a gift, gift set (could be cards, could be an altered item), or a gift card holder of some sort and add the direct link for your project to our collection at the end of this post (or on the Stampendous blog) no later than Thursday, May 31 at 11:59 PM EST .  You do not have to use Stampendous products, but we sure love it when you do!  As an extra incentive for playing along, one lucky crafter (drawn at random) will receive this fabulous new Cling Jumbo Tropical Garden stamp set:


Due to shipping restrictions, the winner must have a US address.  We hope you have a chance to play along with us (you can enter as many times as you'd like!) this month...Happy Crafting!


Details:
Stamps: Vintage Frames (Stampendous), Corset Ladies (Stampendous), Friendship Assortment (Stampendous)
Paper: Chocoalte (Wausau), pattern paper (This and That, Echo Park)
Ink: Onyx Black (Tsukineko), Versamark Marker (Tsukineko)
Accessories: Aged Gold Embossing Enamel (Stampendous), lace edging, Zip Dry (Beacon's), oval die (Spellbinders)

Pin It

Friday, December 3, 2010

A Gift


I had a little get together with the steering team for our local MOPS group this week and decided to use some of my creations as a gift. I have seriously not done this before as a hostess thank you, so I was a bit worried how it would turn out. I think it will be a great simple gift.

I used Verve's Sweet Scallop coordinating stamp and die with silver heat embossed powder.  Just wrapped the clear box with wire rim ribbon like a gift and tied the tag with Stampin' Up silver cord. Done!
 

I'll be back tomorrow with some cards using DigiStamp Boutique images and some more perfectly styled Verve sentiments.  I hear there's a release going on it a few minutes at Verve's SCS forum. Go check it out if you've got some time. I'm off to a Craft Night!

Have a great weekend!

Details:
Stamps: Verve Glad Tidings
Paper: LSS Deep Red CS
Ink: VersaMark
Accessories: Zing! Silver EP, Stampin Up Silver Cording

Monday, November 29, 2010

Something In the Works


Wow! Did you all have a wonderful couple of weeks? It's been a long time since I've posted so I'm sorry it's been quiet around here.

I've was busy with some non-card projects and then I spent two days cooking in the kitchen for our Thanksgiving feast, but then I was able to focus on this project I've had brewing in my head for a while.

Here's a peek at a label I've designed for a friend of mine. I'm not finished adding layers and bling yet, but I added enough to show you what it looks like, because I'm so excited about it.


I started out looking for a die-cut shape that I liked and even though a circle punch or die would have been the best idea, I just had to make it unique. I found the Papertrey Ink Jar Label die the right size and price to try out my skills.

The details on how I cut out the labels after printing them on metallic gold paper are somewhat time consuming, but I came up with a few tricks along the way that might be of some use. Why did I not come up with sooner?

Use a scrap piece of cardstock about a 1/2-inch larger than the diecut shape and center the diecut on and run through your cutting machine.

Have 4-5 small strips of vellum tape (I used Scotch brand) ready to hold the viewfinder and die in place once you have aligned it to your image. Place two pieces on the viewfinder.


Then slip the die cut over the viewfinder and wiggle it about so it can drop into the view finder. Place two strips of tape to secure it to the viewfinder.


The metallic paper is a bit thin and more flimsy than cardstock so it was always getting stuck in the die. I struggled with tweezers and stick pins to my Quick Kutz Tool trying to get them out and then on the last couple of cuts I realized I could use an extra piece of tape to get the cut paper out of the die. Boy, I wish I had figured that out sooner. Let's just say I have a really bad manicure now. LOL

Stuck paper in the die! My nemesis on this project.

My friend makes delicious caramel apples to give out to family and friends, so I hope to surprise her with these labels to use on the packaging. Hope she likes them!

Now I'm off to find the directions on making those accordian fold paper fans that are so popular on tags and cards right now. I think I know how to do it, but after cutting out all these tags I'm going to want to have someone else give me the tips and tricks to doing them.

Take care and have a wonderful Monday!

Details:
PaperTrey Ink Jar Label Die, circle punches, Lauren Script font from FONTSCAPE .com, scraps of ribbon and cardstock.