Featured Post

Rain Puddles Design Privacy Policy (Click for entire post)

I'm working on a new privacy policy for my followers, but for now, you should know that if you comment on my site, my site collects da...

Showing posts with label Card Challenge. Show all posts

Friday, April 1, 2022

Vignette it Your Way


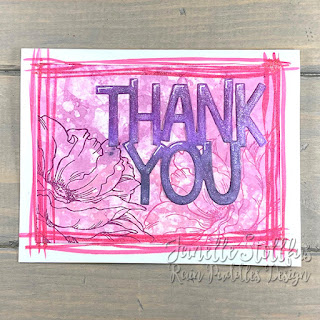
Hi friends! I was so fortunate to drop into my art studio and get some fun sentiment cards done. It just gives me warm fuzzies when I can do that. Today these cards are for the Splitcoaststampers challenge forum, Mix-Ability!

I have three cards to share that came together rather quickly for two reasons. I have a pile of monoprints ready to use and three new die cuts that I was so happy to get at a local, walk-in-the-door craft store! I'm so glad they are still open!


Lawn Fawn has quite a few "Giant" Lawn Cuts that make for a jiffy card session. I have Giant Sending Big Hugs, Giant Thank You, and Giant Happy Birthday.


Each one of my cards attempts to create a vignette. I say attempt because art and mixed media specifically can be jolted into different directions. 

Sending Big Hugs is a monoprint on deli paper inspired by the amazingly talented Birgit Koopsen. I made a vignette or transition by painting whirling lines. I meant to cut the paper along the lines, but when I realized I was gluing my layer on the base I had already cut it into a rectangle. 

Thank you is a transition with simple lines to hide the abrupt edge of the bubble background mat layer. That background is from when I hosted the MIX468 challenge. It isn't noticeable in the photo but I used Spectrum Noir Sparkle Brush Pens so it twinkles it's Thank You.

Happy Birthday is another monoprint that I did for a challenge and loved it but needed to wait for the right card to use it. I believe it's from the MIX460 challenge and just trying to play with brush strokes.

This week it's 


Supplies
: I provide some product links that are through my Amazon Affiliate, and that means when clicked and purchased in the same session a few pennies are sent my way at no cost to you.

Featured Product(s):
  • Giant Sending Big Hugs (AZ, LF)
  • Giant Thank You (AZ, LF)
  • Giant Happy Birthday (AZ, LF)
  • Rose Friend (AZ, STM)
Plus:
  • White Cardstock (AZ, STM)
  • Monoprinting Plate (AZ, GA)
  • Spectrum Noir Sparkle Brush Pens (AZ, SN)
  • Sequins (PPP)

I'm a maker who receives goodies chosen by myself for design team work. To see a list of these companies just scroll to the bottom of my blog under FTC Declaration.

Pin It

Saturday, February 10, 2018

A Purrfect Card with Technique Junkies


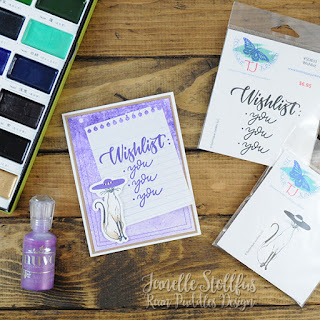
It's getting closer and closer to Valentines Day, and I'm pulling together a stack of lovely cards. Today features a sweet feline with a wishlist just for YOU!


Shop at Technique Junkies with code TJ10Janelle on all regular priced items including the stamps I used on this project!

I made the background with the Pantone Color of the Year in mind, Ultraviolet, using the Spattered Ombre technique varied with a spray bottle of rubbing alcohol! A double row of straight stitches around the outside for detail was done before gluing it onto the kraft paper mat already adhered to the white card base.

A plain old-fashioned piece of paper torn from a memo pad was used to stamp the sentiment in Memento Grape Jelly Ink. Vogue Kitty is stamped with a scotch tape mask over the hat to make the Memento Tuxedo black ink outline and then reversed the tape mask to ink the hat then remove the tape before stamping, trust me I know from experience. Some enamel dots to detail the hat were added after the cat was cut with a wide contour cut.


TechniqueSpattered Ombre

Supplies: I provide some product links that are through my Amazon Affiliate, and that means when clicked and purchased in the same session a few pennies are sent my way at no cost to you.

Technique Junkies:


Plus:

  • Bright White Cardstock by Neenah (AZ)
  • Kraft Cardstock by Recollections (AZ)
  • Memento Tuxedo Black Ink Pad by Tsukineko (AZ)
  • Gansai Tambi watercolors by Kuretake® (AZ)
  • Mini MISTI Stamping Tool (AZ, EH, SP) (magnets, too)
  • Sewing Machine (AZ)** This is the sewing machine I use, and it has been perfect for stitching on paper, but my sister-in-law used it on vacation to make an entire quilt top! Please check reviews and the seller to make your own decision before buying.
  • Thread

See more of Vogue Kitty over on the Technique Junkies blog!

I'm a maker who receives goodies chosen by myself for design team work. To see a list of these companies just scroll to the bottom of my blog under FTC Declaration.
Pin It

Thursday, September 12, 2013

At it again with another sketch


 It's another Paper Craft Planet sketch time! Create and join us on PCP with your creative project! Here's what inspired the sketch...


And here's the sketch...


Details:
Stamps:  Jumbo Leaves and Leaf Background (Stampendous),  and May Arts ribbon.
Paper:  Core-dination's paper, white (Wausau)
Ink: Versamark and Tuxedo Black (Tsukineko), Copic Markers
Accessories: Creative Impressions ribbon, Core'dinations Sanding block

Pin It

Friday, June 21, 2013

PaperCraft Planet Sketch Challenge sk062113


It's time for another challenge from me today. Whew! It's been so much fun to bring you all these goodies one right after another. It's like a progressive party except I'm the one doing all the courses. lol

Yep we've got a new sketch challenge that I'm hosting over on the PaperCraft Planet blog. Hope you join in with this one too. You can use up some of those scraps you've been saving for a rainy day.


I'm using some brand new stamps in my stash from Reverse Confetti. They've been waiting patiently to get inked up and it's just about time I finally did. Hopefully I'll have more chances to get them inky, but for now all I can say it WOW. They stamp like nothing else.

Details:
Stamps: Peacock Pretties and I Like You (Reverse Confetti)
Paper: Kraft (Hobby Lobby), scrap
Ink: Jet Black (Archival, Ranger)
Accessories: sewing machine, foam adhesive dots

Pin It

Thursday, December 6, 2012

Christmas Bling is Silver and Gold

If you are looking for the Verve and Ribbon Carousel Hop scroll down to the next post.

Today I'm playing along with the Silver and Gold challenge over on Do You Stack Up Card Challenge blog with some of my other Stampendous DT gals. We'd love it if you joined us and hopped around from the list on DYSU blog. Stampendous is one of the sponsors for this challenge and some prizes are available. So if you like the bling on my card you'll want to play along to have a chance to win a prize!


I'm using some of Stampendous Impressions' finest and most festive Essentials on this card. It's all about the silver and gold, right? Well here's the breakdown on this card.

The black square panel was stamped with the Jumbo Pinecone Boughs stamp with Versamark once and embossed with Detail Gold Embossing Powder then stamped with Versamark a second time and embossed in Sterling Silver Embossing Powder. Changing to the Fran•táge technique of sprinkling Essentials over the top and heat setting from the back, I added Aged Green Embossing Enamel over the thickest part of the image where the pinecone's are located. Add some Jeweled Gold Mix over the gold bough and Silver Halo Mix over the sterling silver bough.

The sentiment is watermark stamped with Versamark and embossed with in Hematite PearLustre Powder. I used a circle diecut one the sentiment and then the next larger circle on black cardstock. The black cardstock needed to pop a bit so I added Versamark directly to the edges from the pad and embossed with Midnight Black Embossing Powder. The sentiment is trimmed with Silver Halo Mix and Sterling Silver Embossing Enamel on the opposite of the same color bough and then did the same thing with the Detail Gold Embossing Powder and Jeweled Gold. I sprinkled Chunky White Embossing Enamel all over it for a snow effect before I embossed the silver and gold goodies.

For the delish embellishment, I tied May Arts Crushed ribbon in a knot glued it down behind the black square panel. The jingle bells? They are embellished with the one-two punch of coordinating embossing powders and glitter mix just as I did on all the previous embossing steps. Sterling Silver and Silver Halo Mix. Detail Gold and Jeweled Gold, but wait! I did realize I have Gold Halo in the Fran•táge Treasures Mix so I added that to the bell as well. To get the Essentials to stick to the bell, roll the bell around on the Watermark pad then hold it with a pair of tweezers while you heat emboss all the way around it. The bell stays hot long enough for the embossing to be sticky. Roll the bell gently around in the glitter mix of choice and then heat set the glitter. The bells are tied on with some May Arts Hemp twine. That's it!

Now it's time to hop over to the talented, Kristine Reynolds.

Details:
Stamps: Scrolled Seasons (Stampendous), Jumbo Pinecone Boughs (Stampendous via FranticStamper.com)
Paper: Green and black scraps
Ink: Watermark ink (Versamark, Tsukineko)
Accessories: Fran•táge Treasures Vintage Glitter Mix (has both halo mixes included), Detail Gold Embossing Powder, Sterling Silver Embossing Powder, Jeweled Gold, Aged Green Embossing EnamelChunky White Embossing EnamelMidnight Black Embossing Powder, Hematite PearLustre Powder (all Stampendous), crushed silk ribbon and hemp twine (May Arts Ribbon), brass jingle bells, circle die cuts (Lifestyle Crafts)

Pin It

Thursday, October 18, 2012

Vintage Card with Aged Elements


I'm playing along with the Do You Stack Up challenge which is to create Something Vintage (#94). My fingers were itchy to try and distress up the Snowy Postcard stamp from Stampendous, so I came up with this card.


It's got something old written all over it with the collage like layers of a postcard. So my assembly went something like this;

  • Stamp Snowy Postcard on cream cardstock,
  • Distress around edges with Ranger Antiqued Linen and Vintage Photo,
  • Color scene by finger smudging oil pastels,
  • Add snow with Chunky White Embossing Enamel (heat from the backside so it won't blow away),
  • Glue some Guilded Mica Fragments around the scene,
  • Add some faux cards behind the postcard with strips of distressed paper scraps,
  • Tie a twine bow,
  • Glue down onto a red card base stamped with Jumbo Holly Season,
  • Burnish postcard edges with soft graphite pencil. Done.

It was a very easy card to put together with all the effects of something old added to it.

Now here's the best part of today's post, Stampendous is sponsoring this challenge, so head on over to DYSU blog and enter your Vintage style project.

Details:
Stamps: Snowy Postcard (Stampendous), Jumbo Holly Season (Stampendous)
Paper:  Cream and Red card stock
Ink:  Tuxedo Black (Memento, Tsukineko), Antique Linen and Vintage Photo (Ranger)
Accessories: Chunky White Embossing Enamel (Stampendous), Guilded Mica Fragments (Stampendous), oil pastels (Pentel), twine (Martha Stewart)


Pin It

Tuesday, August 21, 2012

Verve 2012 Anni-Verve-Sary Spotlight Day 6

 
If you love Julee's awesome sentiments from the previous five days of Spotlights, you are going to have an even stronger LOVE after today's Spotlight!

My card today uses a few single image stamps from the Featured set, Stronger Love, and I pulled back out the With Love set from our first day of Spotlights to add that tasty cupcake. The note paper is from Making A Statement set released last year in August.


1. Julee8. Andrea
2. Laurie S.9. Charmaine
3. Maureen10. Janelle
4. Teresa11. Betty
5. Tosh12. Christyne {Guest}
6. Amber13. Laurie W. {Guest}
7. Amy


Challenge:
SCS CAS184 "School"

Details:
Stamps: Stronger Love (Verve Stamps), With Love (Verve Stamps), Making a Statement (Verve Stamps)
Paper: Color Basics (K and Co.), Poppy Parade, Lucky Limeade (Stampin' Up), Pewter (Neutech CCC ~ Fox River Paper), White Smooth (Neenah)
Ink: Tuxedo Black (Memento, Tsukineko), Ruby Red and Bashful Blue (Stampin' Up), Copic Markers and 0.08 Multiliner
Accessories:
Rounded Rectangle Frame (A Cut Above, Verve), Classic Oval Large die (Spellbinders), paper crimper (Fiskars), sewing machine, pinking rotary blade (Fiskars), 1/16" hole punch, scissors

Pin It

Friday, April 20, 2012

You're My Hero~ CASE


Happy Friday everyone!

I'm bringing a quick card today that I did joining in on the CASE Study this month with Laurie Schmidlin as the muse. If you've been on any Verve blog hop's you'll know that she's a Diva with some super spectacular talent. I just happen to pick the Study week that was one of her simply powerful designs, which is why I have a quick card today. Here's my card using CASE Study #87 (link no longer valid so it was removed)...


I went with the heart and popped up elements from the inspiration card and used some fun pattern paper from Basic Grey's Picadilly stack pad.

My elements are all Verve die cuts and stamps except the dots popping out from around the collage. They are stamped with an eraser from nearby mechanical pencil, love improvisation sometimes. Here's how my card using my Verve.

I stamped the ribbon banner from the new Super Dad set released last week and die cut it out with the coordinating Ribbon Banner die. The I Heart U die set was used too, and adding a little more character I cut the heart from the i so it looked embedded. The U is stamped with a sentiment from Purely Sentimental, another new set from Verve. All this was popped up over some scraps of brown ribbon. I layered some pattern paper and Crumb Cake cardstock on the yellow cardstock base for a little more texture.


Details:
Stamps: Super Dad (Verve Stamps), Purely Sentimental (Verve Stamps)
Paper: Picadilly paper stack (Basic Grey), Crumb Cake (SU!), Yellow
Ink: Cocoa (CTMH)
Accessories: Ribbon Banner Die (A Cut Above Die, Verve Stamps), I Heart U (A Cut Above Die, Verve Stamps), ribbon, zig zag rotary cutter, pencil eraser

Verve Stamps website is no longer available so links have been removed. New designs by Verve’s artist, Julie Tilman, can be found at Sweet and Sassy Stamps. 

Pin It

Wednesday, March 14, 2012

God gives all birds their food...


but does not drop it into their nests. Danish Proverbs

At the beginning of the year I purchased some Layers Of Color stamps and stencil and while waiting for a few more to come back in stock I found out that something was a' stirring. A new adventure for the owner/artist, Laura Campbell, was being announced during CHA. She's going to discontinue her e-commerce site and start designing for Spellbinder's and a new line TBA, but also resident artist for a Redmond Wa. company called Imagine Crafts. Sometimes you have to go find those adventures and sometimes... they DO drop into your nest. I'm sure someday we'll get to hear the whole story from Laura.

For me, crafting time has not dropped into my nest so far this week. I had to go grab it last night because I've been catching up on house work and wrapping up some more promotional pieces for the women's conference in April. I hope to be able to get my craft room all cleared out for a craft night I'm hosting in a couple of weeks. It's those crazy fabulous artsy friends of mine that are coming, but my sister from Oregon will be here too! She's definitely got some artsy talent up her sleeve taking a quilt class from a popular designer that happens to be in Boise for the weekend. So, I've got to get more "inspiration" out of the room so we can create more of it! Isn't that how it always goes?

So, instead of clearing and cleaning it ALL up I just cleared a space and time for this card.


 I used a sketch blog I've been stalking from my fellow Diva's Amber and special guest Amy. It's from Jen Shult's Deconstructed Sketch. She always has the best constructed sketches.

Keep in mind...
Verve is having a Spring Sale! 15% off on selected items,

Stampendous continues to celebrate March with a deal for National Craft Month.

Take the links to get inspired and enabled to create! I'll be back closer to the weekend with some challenge cards to share.


Tuesday, February 7, 2012

Julie and Julia - On the Red Challenge


Good morning to all you crafty people!

The CAS-ual Fridays challenge has been brewing in my mind for a few days and yesterday this little gal from Verve's Twitterpated set came to mind as a perfect fit for the On the Red challenge. Either Julia... or Julie. Can you guess the movie that is inspiring this card? Not hard since I gave you two-thirds of the title... Julie and Julia.

There is a point where Julie goes to a museum of sorts about Julia and stands in front of a portrait. This is where my card's inspiration comes.


I selected some small pattern paper from the Love Me pack by My Mind's Eye. A lacey dress for Julie. A heart pattern for the frame. Some polka-dots for dress ruffle.

My little gal is stamped on some cream paper with Tuxedo Black ink and colored with a few Copic markers. She gets a little platinum liquid pearl treatment on her dotted tresses before she is paper-piece dressed and don't forget the polka-dot ruffle. She also got a bit of a lift from some dimensional dots. I added a little pearl necklace made from a dot of liquid pearl and AtYou Silver Spica Pen.

The frame is cut using the Rounded Scallop Frame Die from Verve's A Cut Above line. I stamped a linen background stamp on it for texture. The heart pattern received a "hand-stitched" border using a PITT artist pen and a Omni-grid ruler. A sentiment in Cocoa ink is die cut out using another Verve-y good die called Charming Oval Die Set and popped up with dimensionals.


I finished the design off with some more hand drawn stitching and stamped some hearts under the frame from the Twitterpated set.


The CFC #38 challenge runs up to 11:59 pm EST on Wednesday. It's CAS so you have lots of time to get one in before the deadline. What's your favorite movie?


Details:
Stamps: Twitterpated (Verve Stamps), Linen BG (SU!)
Paper: Love Me (My Mind's Eye), Kraft (Wausau), Cream (Wausau), Soft Suede (SU!)
Ink: Tuxedo Black (Memento, Tsukineko), Cocoa (CTMH), Alcohol Markers (Copic), PITT artist pen (Faber-Castell)
Accessories: Rounded Scallop Frame die (Verve Stamps), Charming Oval die (Verve Stamps), Silver Pen (AtYou Spica, Copic), Platinum dimensional paint (Liquid Pearls, Ranger), omni-grid ruler

Pin It

Tuesday, January 31, 2012

Love Gave Wings

Hi all!

I'm always amazed at the talented crafters out there and the way that they can put so much into a small amount on a card. I've been catching the Google Reader feeds this month for the CASE Study Challenge and it was finally time to jump in and create from one of those talented inspirations from Jen Rzasa. What a wonderfully talented lady! Today is rounding up her time as January's muse and Chupa will be introducing another one for February on Thursday. I wonder who it will be?!?!?!?


This card is a wonderful reminder of what a little can do for a super CAS card. It's amazing! 


 Here's my CASE Study #75 inspiration card.


The sentiment comes from the Wings of Love set by Verve Stamps which was stamped in Versafine Onyx Black onto Mohawk Smooth White and cut out with Rounded Rectangle Frame also from Verve. I pulled out a scrap of muslin and die cut that with Verve's Rounded Scallop Frame Die and dirtied it up a bit with the W family Copic markers.

I've been holding on to a yard of some Maya Road ribbon. It was originally cream color and you could see the netting base peeking out from the back. I trimmed the flower away from the netting and pulled out my copic markers in the YR, Y, R, BG and W families in groups of three and began coloring them for the twine colors in the inspiration card. To finish the embellishments, I brushed the cut ends of ribbon with some YG and G family markers to look like leaves.


Details:
Stamps:  Wings of Love (Verve Stamps)
Paper: Mohawk Smooth White
Ink: Onyx Black (Versafine Tsukineko), copic markers
Accessories: Rounded Rectangle Die (A Cut Above die Verve Stamps),  Rounded Scallop Frame Die  (A Cut Above die Verve Stamps),  organza white rose ribbon (Maya Road), glue (Beacon 3-in-1), muslin

Verve Stamps closed their doors in 2018 and so, I’ve removed links. New designs by @VerveGirl, Julee Tilman, can be found at Sweet and Sassy Stamps. 

Pin It

Tuesday, October 25, 2011

Thank You Caregiver's in Greeley


I've been enjoying the little bits of time I've had this month to get in to my craft room. I thought I'd be able to handle all my obligations and still get a post or two in a week. It hasn't turned out to be that way at all, but I had to create when I returned home this weekend.

My card today is another Viva La Verve sketch Week 2 designed by Teresa Kline. She has a way with circle layouts, doesn't she you know. The theme of the card is for the SCS Hope You Can Cling To Challenge, Thank a Caregiver card with an attempt at the Try a New Technique challenge to stamp a border.

My father had many care-giver's in the last few years of his life. Life Care, Sterling House staff and most importantly my older brother and sister who took care of all the emergencies and "small" stuff that made a big difference in my dad's life. I mentioned in my previous post that he passed away this month from an injury resulting from his battle with Parkinson's Disease. While it isn't the focus of SCS challenge this month, I couldn't help but think of my dad and all the helper's he's had a long the way.

Some of my embellishments are from a RAK package Verve sent out a few months ago with my order. I've taken the dark brown trim and hand stitched it with some twine across the middle of the doily using old DMC embroidery thread. I needed to do a border on the card base and thought it would go quicker to use the sewing machine for the stitch holes and when I finished the holes on the back of the paper was a wonderful design so I left it alone and added a hand-drawn line. Some Cinnamon Stickles is dotted around the doily and the corners of the blank thread stitching to weight down my layout. The white tissue flower I made a while ago and saved just hoping I'd have a use for it. : )


The ticket is from the Lifestyle Crafts die set I fell in love with at my local scrapbook store. NEEDed it! LOL The stamped filigree is from the Verve set, Thankful Notes, that you can see around the circle pattern paper and the top of the ticket. "Thank You" is from the Words Cannot Express set from Verve also. The paper is from K and Company Ancestry.com pack


Details:
Card Size: 5 1/2-inch square
Stamps: Thankful Notes and Words Cannot Express (Verve)
Paper:  Pattern paper (Ancestry.com K and Company), Tissue Paper, White cardstock
Ink: Sage Shadow, Really Rust (Stampin' Up), Brown Bag, Parchment (CTMH)
Accessories: Sewing machine, Sew Easy Tool (MME), flower punches (EK Success and Stampin' Up), brown trim, hemp twine, embroidery floss, corsage pin, cinnamon and iridescent glitter glue (Stickles), paper doily, ticket die (Lifestyle Crafts)