
On your MARKers! What a clever title, right? It is a challenge coming up with things to start off with, but this time it was easy. The phrase is actually the title of my latest hosting gig on Splitcoaststampers.
I'm currently slowly working on organizing my art supplies in the re-remodeled room from last year's water leak catastrophe. That means that I've got to go easy on pulling out my supplies. Honestly, it's still a scavenger hunt every time I need a main supply like, let's say, Mono Liquid glue.
Okay, so on to my card and link to go join in on the challenge.

Play along in the challenge, MIX524: On Your MARKers! over on Splitcoaststampers Mix-Ability Challenge Forum.

Featured Product(s):
- Crayola Markers (AZ)
- Cardstock (white - AZ and choice of 2nd color or AZ)
- Water Brush Pen (AZ)
- Tonic Studios Glitter Marker (Couldn't find but I also use Wink Of Stella for this purpose - AZ)
- STAEDTLER Triplus Liner Marker Set (Couldn't find but I also use Wink Of Stella for this purpose - AZ)
- Tonic Studios Glitter Crystal Drops (AZ)
- Echo Park Love Die Set (Retired sadly, but a great option is Lawn Fawn Scripty Love - AZ)
- Copic Multiliner 0.03 (AZ)
- Memento London Fog Ink Pad (AZ)
- Heart Row Stamp (mine are about 1/8-inch tall)
- Use or make a heart stencil. I made three hearts of different sizes and shapes with copy paper.
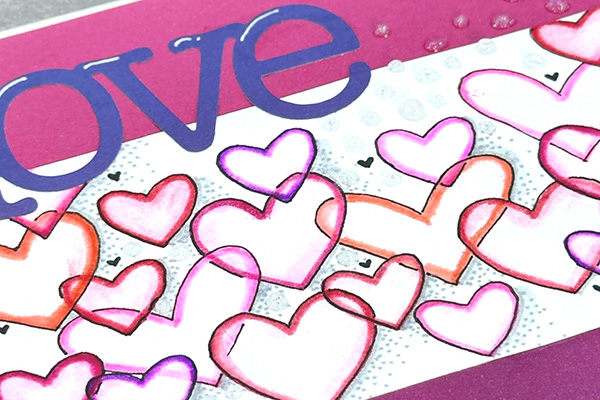
- Grab your favorite colors in Crayola markers and start overlapping 2-3 hearts on white cardstock.
- Go back to each heart and wet the inside edge of the marker heart with a water brush pen. dilute it towards the center to fill the heart with a tint of color.
- Continue with steps 2-3 until you have covered the cardstock size of your choosing. My cardstock was about 4 inches by 3 inches.
- Grab a light-colored gray pen from the Triplus set and shadow all the bottom-right sides of the hearts only on the outside. Add some fading dots if desired.
- Go back over the shadow lines with the Silver Glitter marker.
- Glue heart cardstock onto a colored cardstock layer or directly onto the card base.
- Trace each heart with a multi-liner black pen giving the effect that some are in front of other hearts. Add tiny hearts around for more detail.
- Die-cut the word love and glue on onto the card base. Highlight with white gel pen.
- Start adding iridescent crystal drops from the top-right to the bottom-left across the card.
- Optional: Add a row of stamped hearts across the bottom of the card, I chose London Fog ink.
I'm a maker who receives goodies chosen by myself for design teamwork. To see a list of these companies just scroll to the bottom of my blog under FTC Declaration.
No comments:
Post a Comment
Thanks for stopping in today and leaving me a comment! It brightens up my day!
I moderate all of your lovely comments, so if you don't see yours publish right away it's in my Inbox waiting to be read.
Have a wonderful day!