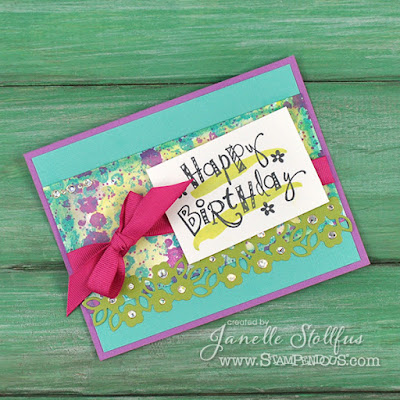
Ever thought you might need a pattern paper or design custom as a maker? Stampendous has released new Texture Cubes, Ornate and Quest, and they are a mixed media friend! Yes, two more cubes join the Cube Club with Foliate Cube, Marble Cube, and Tiled Cube. Click to see them all here.
While I wouldn't attempt rolling the Texture Cube to stamp, I'd roll it around in my hands to see which one I was going to use next. I love both of the new ones, but I decided for my project I'd use the Quest Cube.
I made a real quick background, but I can think of using them for some pretty unique impressions in embossing powder or use with paint and monoprints. It's just the right size for my small hands to go quickly back and forth from ink to paper. Check out the supplies and instructions below for more information.
Here's the Texture Cube hop. Stop by today's blogs and come back later in the week for more inspiration!
Monday
Wednesday
Friday
Here's how I made my Happy Birthday card.
Supplies: I provide some product links that are through my Amazon Affiliate, and that means when clicked and purchased in the same session a few pennies are sent my way at no cost to you.
Stampendous:
- Funky Alphabet Perfectly Clear Set (AZ, STM)
- Quest Texture Cube (AZ, STM)
- Spring Borders Cutting Dies Set (AZ, STM)
- Memento Tuxedo Black Ink by Tsukineko (AZ, STM)
- Dot Sparklers Class A Peel Stickers (AZ, STM)
- Mixed Media White Paper (AZ, STM)
- Acrylic Stamp Handles (AZ, STM)
- My Colors by My Mind's Eye
- Distress Oxide Ink Pads (Amazon Links) - Twisted Citron, Peacock Feathers, Seedless Preserves
- ZipDry Paper Glue by Beacon Adhesives (AZ)
- 3D Foam Adhesives by Scrapbook Adhesives by 3L (AZ)
- Ribbon by Creative Impressions
- MISTI Tool by My Pretty Petunia (AZ, EH, SP)
- Paintbrush (AZ)
- Stamp Quest Texture Cube with two colored inks and add the third from a palette and water loaded paintbrush.
- Tie ribbon around Quest stamped panel and glue onto 4 x 5-1/4 inch colored cardstock
- Die cut floral border from colored cardstock and glue across the bottom edge of the stamped panel. Add Dot Sparkler stickers to flower centers and on the top left of the panel.
- Stamp sentiment with black ink onto Mixed Media White Paper, adhere with foam adhesive to card base next to ribbon.
- Glue to folded 4-1/4 x 5-1/2 inch color cardstock base.


Why have I not seen these before? So cute.
ReplyDeletethis is a new product for me.
ReplyDeleteLooks like something I need to
try. thanks for sharing.
txmlhl(at)yahoo(dot)com
Illinois
Love the colors on your pretty card!
ReplyDeleteVery pretty.
ReplyDelete