
Happy New Year, everyone! I've been working on projects around my house, still living in the same crazy boxed-up craft studio while a very long process of remodeling and moving rooms around our house.
Even though my situation is a little less than desired, I'm still happy to have what I have access to, and that ever so often I'm fortunate to be the hostess of the most fun challenge on Splitcoaststampers. Today I'll be sharing a photo tutorial of a new find on Youtube. I'll tell you the source in a bit, but here is my photo summary for papercrafters! Look at the bottom of the post for links to products involved in the card above.

I followed the video instructions and made lines for my planks with pencil and rulers. I made it easy on myself and did 1-inch width planks and centered them on a 4-1/4 x 5-1/2 inch white cardstock.
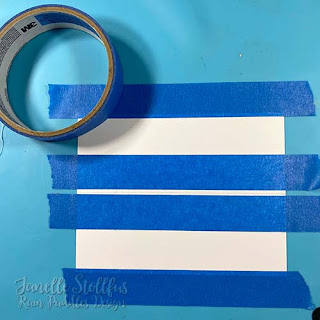
Again from the video, I taped off two planks. It helped keep my paper in one place.

As with the video, I layered my paint but realized I needed to work fast with the base color because it soaks into the paper FAST!

Once the first two colors were down with a flat brush, I grabbed a stiff bristle stencil brush (#4 size) and made a knot by twisting the brush in a spot along the plank. Moving quickly, use the stencil brush to create the grain.
Now here is the paint sequence I used.

DecoArt paint from left to right is Lamp Black, Burnt Umber, Antique White, Milk Chocolate.

Start with Antique White.

Roughly add Milk Chocolate.

In smaller, more sparse amount is Burnt Umber. and spread roughly around.

Quickly pick up the stiff bristle brush, twist a wood knot along the plank, and then make grain lines across and around the knot. The paint will be dry in spots, but don't worry about it. You can add more paint layers if you want and do more grain lines.

A small brush loaded with a mix of Burnt Umber and Lamp Black is brushed along the tape and a little bit across the plank. Keep reading before starting this step.

In small sections apply the mixed paint and then go back and rub it into the edge of the tape so there isn't a hard edge on the plank. If the paint dries too quickly rinse your brush and paint water to lift the paint and then smudge it for some transparency. What is up against the tape will create a hard edge for the plank.

What is up against the tape will create a hard edge for the plank.
NOW... this amazing video that I talked about is by Kayla of Kayla's Creative Corner. If you try it out, please give her all the credit. It's a genius and easy method for faux wood grain.

Want something a little more weathered-looking? I tried it and was pleasantly surprised to use Craftsmart Tan as the base, Craftsmart Suede, and a mix of Suede and Black as the top layers. Voila!
Now if you play on Splitcoaststampers join in the challenge

Supplies: I provide some product links that are through my Amazon Affiliate, and that means when clicked and purchased in the same session a few pennies are sent my way at no cost to you.
Featured Product(s):
- DecoArt Lamp Black (AZ), Burnt Umber (AZ), Antique White (AZ), Milk Chocolate (AZ)
- Mama Elephant Puppy Play by Hampton Art (AZ)
- Craftsmart Tan (AZ), Suede (AZ)
- Stencil Brush (AZ, STM)
- White Cardstock (AZ, STM)
- Tonic Studios Nuvo Blue Lagoon Crystal Drops (AZ)
- Versamark Watermark (AZ)
- Detail White Embossing Powder (AZ, STM)

Fun! I accidently did this technique last fall when I painted something creamy yellow and didnt like it. Painting brown over it I got a very similar effect on my wood. Whew! It really does look real! Never thought to try it on paper! Thanks for the inspiration! ♥ Sue Kment
ReplyDelete