Featured Post

Rain Puddles Design Privacy Policy (Click for entire post)

I'm working on a new privacy policy for my followers, but for now, you should know that if you comment on my site, my site collects da...

Tuesday, April 30, 2013

Verve's Mother Day's Cards


It's time to start sending out those beloved cards for Mother's Day. I'm actually created a few extras this year for a donation at my church. Every year I wonder if it would be a good idea to have a few dozen made up and sitting at the greeter's desk on Mother's Day morning. You know, just for those sons and daughters that might have forgotten? :)

Each card is using Verve sentiments from Joyful Blooms, and Love Deepens.


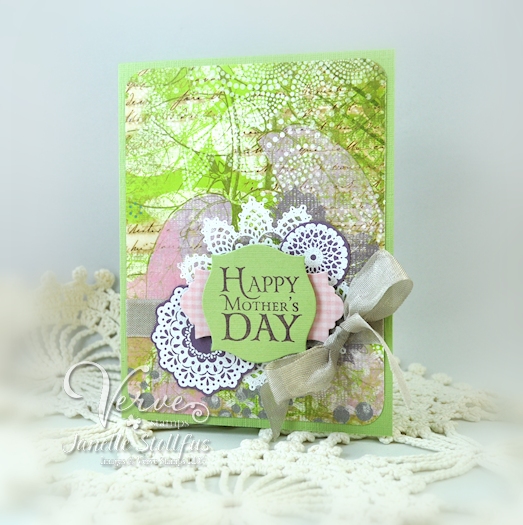
This little lovely uses the frame from Verve Stamps, Love Story back dropped by die-cut and embossed vellum.


I used the flowers from Joyful Blooms and embossed them with Stampendous Detail White embossing powder (boy that stuff is shiny!) I added some adhesive backed pearls and some of Verve's luscious Seam Binding ribbon from Spring Fling Collection and added some stitches. Oh, see I even added an embossed doily in the background (see the next card for details).

 I added some lace doily stamps from My Mind's Eye, CUTIE PIE Clear Stamp Set, and new to me Stampin' Up Apothecary Framelit Dies. Seam binding ribbon is from Verve's Signature Ribbon Collection.

Are you ready for Mother's Day?

Details:
Stamps: Joyful Blooms, Love Deepens and Love Story (Verve Stamps), Cutie Pie (MME)
Paper: Various solid cardstock for bases (Wausau and Craft Warehouse packs), Jubilee Pattern Paper (K and Company)
Ink: Perfect Plum, Soft Suede, Rose Red (Stampin' Up), Watermark (VersaMark, Tsukineko)
Accessories: Lovely Marquee die (A Cut Above, Verve), Spring Fling Ribbon CollectionTruly-Madly-Deeply Ribbon Collection and Signature Ribbon Collection (Verve Stamps), eyelet circle die (Spellbinders), vintage wool thread and nylon thread (friends and mine stash), Detail White Embossing Powder (Stampendous), Juli's Garden embossing Folder (Cuttlebug), sewing machine, paper piercer (Stampin' Up), buttons, corner chomper (WRMK)
Pin It

Friday, April 26, 2013

Do a little Doodling Challenge


Miss Lydia on Splitcoast Stampers has a challenge for us in mixed media today. Use your doodling skills and two or more media on your creation. It's easy-peasy this week.

Mix-Ability Challenge: MIX13

Here's my check off list

  • Media 1 - ink from a stamp pad
  • Media 2 - water soluble oil pastels (yes there really us such a thing)
  • Doodling + Media 3 - BONUS, right? Black India brush pen

I stamped flowers on white cardstock that was die cut with a Spellbinders Label die. Coloring them up with some water soluble oil pastels.

Now it's time to water down the color with an aqua pen, but first I sketched in some two-tone green leaves (I forgot to snap a shot until I had already done the waterbrushing so the only leaves still sketched are to the left of the sentiment. It's a lot of fun coloring with these pastels)

Now it's time to doodle! Since the pen is a brush I was able to pressure adjust the doodling and got some crazy squiggles. Here is the finished card with all it's squiggles complete.

 
 It's easy peasy as long as you don't use the aqua pen AFTER you added the india ink medium. When you go back over it afterwards you get a very messy black haze all over your bright cheery flowers. Start over and remember it a second time, then it's easy peasy again.

Details:
Stamps: Surely Goodness (Verve Stamps)
Paper: Smooth white (Neenah), Kraft (Wausau)
Ink: Jet Black (Tsukineko), water soluble oil pastels (Smith and Binney/Crayola), India ink brush (Pentel Color Brush)
Accessories: Label die (Spellbinders), aqua pen

Pin It

Thursday, April 25, 2013

Have you embossed lately?


Have you gone to get your e-book this month? It's a great one, All About Embossing!


It's affordable and fun to learn new ways to use the supplies you already have *in stock*!

Go to my Club Cr8 Page for the list of all available e-books.


Wednesday, April 24, 2013

Do – do you suppose we'll meet any wild animals?


Oh Happy DAY! It's Stampendous Catalog Release time! 
We are going to OZ with so many awesome stamps! Here's one that I created using the new Overlooking Oz stamp with the Classifieds Background Stamp to texture the card base.


Stampendous Art Director, Lisa Hindsley,  is joing the designing team with new OZ theme stamps. Here's a catalog introduction to these amazing new stamps.


AND

Stampendous has a full line of Digital Downloads to go along with the traditional stamps in the catalog.

For more inspiration, stay connected to the Stampendous Blog or Facebook Page for more Catalog showcases!

Details:
Stamps: Overlooking Oz (Stampendous), Classifieds (Stampendous)
Paper: Bazzill Basics cardstock in kraft and coral, white (Neenah), cork sheet
Ink: Tuxedo Black (Memento, Tsukineko), Versamark Watermark (Tsukineko), Prismacolor Color Pencils
Accessories: Aged Taupe Embossing Enamel (Stampendous), May Arts leather cord, Foam Adhesive Dots, Beacon Fabri-Tac glue


Pin It

Tuesday, April 23, 2013

Verve Diva Dare ~ Bright Blooms and Butterflies


It's time for me to share how I took the Diva Dare over on Verve Stamps blog. See you over there!


If you think you don't want to take the link to the Dare, then here's a bit of incentive. There are two ways to win some shiny new Verve! Yeah, k.


I used the Mojo Monday sketch #290 and was inspired to let my flowers and butterfly grow wild. :) They didn't want to stay in place, I tell ya.

Details:
Stamps: So Fluttery and Surely Goodness (Verve Stamps)
Paper: Miss Caroline Dolled Up (My Mind's Eye), Night of Navy (Stampin' Up)
Ink: Tuxedo Black (Tsukineko), markers (Copic)
Accessories: Scalloped Trim Trio Die Set, Banner Bundle Set,  Loopy Blooms Die Set, Essentials Paper Piercing Pack (Stampin' Up), twine (The Twinery)

Pin It

Monday, April 22, 2013

Club Cr8: All About Embossing Winner


Before I announce the Club Cr8 winner from my post last week I want to invite over to see a free Monday Tutorial on Paper Craft Planet that I hosted. It's on a few fun sewing techniques. Have a look-see!


We've been selling a lot of Club Cr8 e-books, they really are packed with techniques, details and loads of step photos.  If you aren't the lucky winner from my blog giveaway, you can always go to my new page tab at the top of my blog for Club Cr8! The links there will take you straight to the Buy Now page so there's no waiting in line. :)

Here's the winner... 
Virginia Montagna
 montagnava AT aol.com 

 Congratulations!!!!!! Please contact me and verify I have your correct email address.

Here are the details of the card I created for the Embossing e-book.


Details:
Stamps: Surely Goodness (Verve Stamps)
Paper: Anthologie (weRMemoryKeeper), Smooth White (Neenah), lilac (Craft Warehouse pack), ginko (Wausau), 
Ink: Jet Black (Tsukineko), acrylic paints, water soluble oil pastels, Prismacolor Artist pen
Accessories: bubble wrap, black rhinestones (KaiserCraft), label maker, DIY embossing folder (tutorial from Club Cr8), paper distress tool


Pin It

Friday, April 19, 2013

Stampendous and PL together... NICELY done


It's blog hop day with Project Life and Stampendous Impressions!

The Design Team is putting on some flair with our Stampendous supplies and Becky Higgins Project Life Page Protectors.
But before we get to my project there is the important matter of PRIZES! Oh yeah, if you have been with us all this week you know that Laura at Stampendous has oodles of prizes in store. It's easy to have a chance to win, just comment away! Details are all on the Stampendous Blog

Back to my project. Oh my pages came together like a storybook! I know that's how they are suppose to be with divided page protectors, but I started with a picture of my son maneuvering around with a clunky toy. 

On the first half of my two-page Project Life spread I captured my son. He's got an elephant rocker my dad made for me when I was his age. My dad was crafty with wood and so was his dad. They had lots of tools to get the job done and I suppose as I thought through this layout I realized all the tools I have to get my crafty jobs done.


Stampendous products used for the first page:
ARTIST ELEMENTS (sneak peek alert! You can find this at most retailers soon! REAL SOON!)

For the second half of my layout is a sequel of sorts to the first page. My train of thought went from something my dad made me to how I make things, we both have a lot of supplies to do what we do and then among some of the precious to me items I found were sets of rubber stamps. Stamps that I believe my grandpa used to mark the grandfather clocks he made. It's something I wanted to document.


Stampendous products used for the second page:
CLING TYPING ELEMENTS (another sneak peek alert!!!!! Yep, it's a new April stamp coming soon!
CLING TIN PANEL
INSPIRATION EXISTS

That's all from me today! There's more inspiration ahead. Here's a list of some fellow designers.

Janelle Stollfus (you are here)

Details:
Stamps: See links under each page
Paper: Bazzill Basic Papers, Tim Holtz Distressed Core-dination paper
Ink: Jet Black (Tsukineko)
Accessories: acrylic paints, Ochre Color Fragments (Stampendous)

Pin It

Feeling a little mixed and POPpy today


It's another mixed media challenge and Dina's got a great one for us with the Mix-Ability Challenge. I pulled up my sleeves, only to get more messy with my paints, and created a card.


I started out with some scraps of cool colored pattern paper and glued them to an index card I printed lines on for a rolodex project (see the day number faintly in the top right corner?). I watered down my warm color acrylic paints with water and brushed them on scraping and smudging it around with an old credit card. A layer of gelatos blue set around the edges before gluing it on to a purple mat.


It was time for a splash of warm. I stenciled on a slight mix of Medium Red and Naphtol Light Red acrylic using a Deco Art stencil in the bottom right corner. My old toothbrush was loaded with watered down warm grey paint and splattered all over.

I used a fine line Sharpie to outline everything once I added a cut out sentiment from another piece of scrap paper. I added some leaves from another Deco Art stencil and outlined again. Some dabs of warm grey paint for highlights throughout the card front and then it was time to add it to a kraft card base.

Details:
Stamps: none
Paper: scraps of paper
MEDIA: Acrylic Paints - Light Blue, Phthalo Turquoise, Phthalo Green, Medium Red, Naphtol Light Red and Warm Grey; Sharpie Fine Line marker
Accessories: Deco Art stencil for Martha Stewart line, glue, paintbrushes and toothbrush

Pin It

Thursday, April 18, 2013

Facebook Cover Photo Update


See that up above? I made that all by mah'selfs.

I created some graphics to do for a map making activity in my kids Caravan's class at church last night. They were still on my computer screen when I got home since I made them right before we left and so when I sat down I got an idea to use one of them again. I was smitten with the city street/scape that I made and so I colored it and decided to use it as my cover photo in Facebook.

I might like to stop in sometime there and get a latte. Or maybe I'll add another building with a latte sign... if I have enough time.

What's coming up??????

Late Thursday night I'll be posting a journal page with the next Mix-Ability challenge! Have you jumped in on the mixed media challenge this week? I hosted MIX11 and Friday the new one is hosted by talented Miss Dini.
I'll be back on Friday with another Project Life layout and a Stampendous Blog Hop with prizes. Did you know that you can get a prize for commenting on our team posts? Go to the Stampendous blog and find all the posts for Project Life this week and comment away!
Comment to win a free April Club Cr8 e-book at this POST! Deadline is Monday 5:00 p.m. MT. One comment per person please.


Wednesday, April 17, 2013

April Club Cr8: Hurry and Grab one Today!


The April Club Cr8 e-book for this month is now available!

This month is all about embossing…

  • Wet and dry embossing tips and tricks.
  • How to make your own embossing folders and impression plates
  • Wet embossing with stamps and stencils
  • and much, much more!

Now if you MUST get one right now (really you must) then head over to Paper Craft Planet's blog and straight to the Add to Cart button. You're gonna love all the lessons in it!


Here's the card I made using the DIY Embossing Folder lesson.

Now here's the fun part! I'm giving away a FREE Club Cr8: All About Embossing e-book! Just leave one comment on this post including your email and I'll draw a random winner on Monday, April 22, 2013 5:00pm MT.

If you can't wait, go HERE and buy the April: All about Embossing e-book today!

Did you miss the March Club Cr8: Die-Cutting e-book? It's still available, get details and buy it here.

Pin It

Monday, April 15, 2013

PL: Which Day is a good day


Today is the start of a fun collaboration with 
We are having some fun creating and recording the two companies products together. Any day is a good day to start!

Today I'm sharing a layout from the week before last on the coming of spring. Nature is starting to blossom and at the same time so it the need for baby blankets. Hee-hee, it just so happens it's time to replenish the baby dedication blankets for our church, too. 

The focus of my post though is going to be making your own unique kit cards. It's really fun to do and since they aren't the focal part of your PL pages you can have a little more freedom to play.

Here's my layout. Don't mind the lack of journaling, it's my perfectionist mind that wants to make sure I don't mess up on the handwriting and not that I want to share what's on my mind. :)

(UPDATE: I added my thoughts finally.... digitally at least.)

(Click image to enlarge.)


Getting Started
I followed the pockets of Design A layout (the right-hand page of my full spread layout) and on a 12 x 12-inch piece of cream cardstock by WorldWin. Doing this will create enough cards to use in a Design A and C layout, then add your photos or ephemera.  I scored some lines on my cardstock for guides for stamping in the right spots. The first one is at 6-inches (A).


I rotated it a quarter turn and scored at 4-inches (B) and 8-inches (C).


Then I rotated it back a quarter turn and lined up the 6-inch score (A) on the 3-inch mark of my trimmer and before laying down the slide bar I moved my score blade up to 4-inches then pressed down on the cardstock and scrored up to 8-inches (D). I repeated this again by flipping the cardstock and lining up the 6-inch score (A) on 3-inches and scored on the paper between 4-inches and 8-inches (E).


Stamp and emboss with Midnight Black powder.


Sprinkle color embossing powders and for the glitters sprinkle clear embossing powder down first.


Stamp and emboss within the score lines or cross over to stamp two edges.

I chose to embellish with sewing on my cards.


Stamp a Title card (or hand write some of it). I used a new Vintage Alphabet set from Stampendous that will be in stores soon!


Stamp an inspirational quote or favorite sentiment as a filler card. Thoughtful Wishes, Hydrangea Bunch and Garden Background stamps were used here.


Whew! That was a long post. I'm so glad you made it this far with me.

That's all from me today! I hope you were inspired to try One Day with Becky Higgins Project Life and Stampendous products... any day is a good day to start!

Details:
Stamps: Garden Background (Stampendous), Thoughtful Wishes (Stampendous), Hydrangea Bunch (Stampendous), Vintage Uppercase and Vintage Lowercase IN STORES SOON (Stampendous)
Paper: Cream Cardstock (Worldwin)
Ink: Memento Jet Black (Tsukineko), Versamark Watermark Ink Pad (Tsukineko)
Accessories: China Blue Micro Glitter, Sunflower Micro Glitter, Rose Ultra Fine Pearl Glitter, Jade PearLustre Embossing Powder, Aged Rose Embossing Enamel, Midnight Black Embossing Powder, Topaz PearLustre Embossing Powder, Clear Detail Embossing Powder (Stampendous), black thread and sewing machine

Pin It